Introduction
The objective of this post is to explain how to connect the ESP8266 to a DS3231 Real Time Clock. It also explains how to create a simple program to configure the time and date of the RTC and to measure it periodically.
If you prefer, you can check a video tutorial on my YouTube Channel:
Hardware
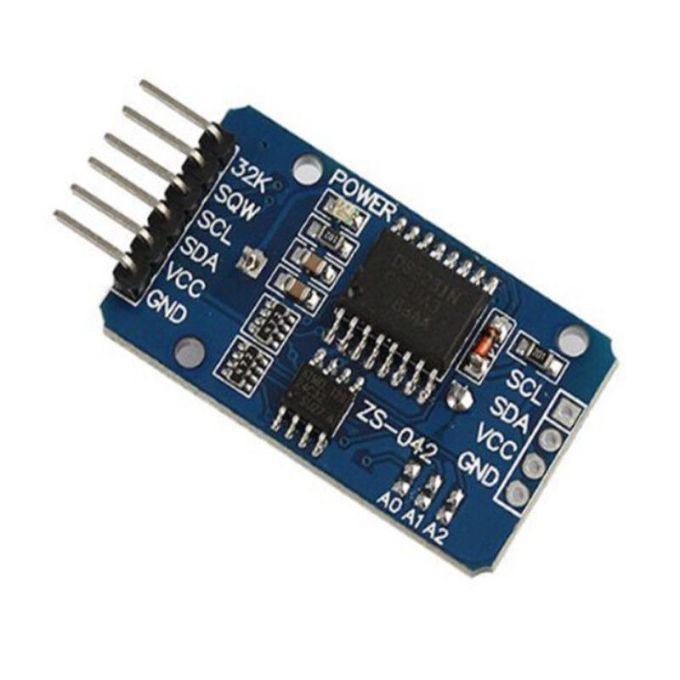
For this tutorial, we consider the use of the DS3231 Real Time Clock (described in more detail in this previous post) integrated in an easy to use board, which can be bought at eBay for less than 1 euro. This board is shown in figure 1.
We also assume the use of the ESP8266 libraries for the Arduino IDE. You can check here how to configure the Arduino IDE to support the ESP8266.
The hardware diagram to connect this board (which we called DS3231, for simplicity) to the ESP8266 is very easy and is shown in figure 2.
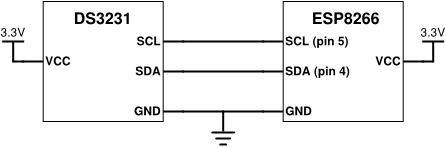
As can be seen in the diagram, the DS3231 uses an I2C interface to interact with microcontrollers. Since we are using the Arduino IDE, we have the Wire library available to handle the I2C protocol in the ESP8266, which we will later use when creating the program to interact with the RTC.
As described in the documentation of the ESP8266 libraries for the Arduino IDE, the default pins for the I2C in the Wire library are pins 4 (SDA) and 5 (SDL). If you are using a NodeMCU board, take into consideration that the board pins don’t correspond to the ESP8266 pins (check here the correct mapping).
The tests were performed using a NodeMCU board, a very cheap and easy to use ESP8266 board.
Software Library
As usual, the Arduino Environment provides a wide range of libraries to interface with different devices, and the DS3231 is no exception. So, we use the library shown in figure 3 which, as stated in the description, is tested on the ESP8266.

This library provides easy to use functions to interface with the RTC, without the need for the programmer to worry about the low level details of the I2C protocol. Besides that, it comes with some code samples to help us get started.
We can install it using the library manager of the Arduino IDE.
Software
As stated before, we will create a simple program to configure the time and date of the real time clock and then read it from 20 to 20 seconds and print it to the serial console.
First, we need to include the newly installed library that allows us to interact with the DS3231 and also the Arduino library that implements the communication with I2C devices (wire library):
#include <Wire.h> //I2C library
#include <RtcDS3231.h> //RTC library
The functions to interact with the RTC are provided as methods of the RtcDS3231 class. So, we declare an object of this class before the setup function:
RtcDS3231 rtcObject;
Update: If you are using version 2.0.0 of the library or greater, then you need to declare the object as follows:
RtcDS3231<TwoWire> rtcObject(Wire);
In the setup function, we begin the serial connection and then we call the Begin method on the RtcDS3231 object we previously declared. By analyzing the source code for this method, we can see that it only starts the I2C Wire library by calling the Wire.begin() method. Nevertheless this is just a detail that we don’t need to worry about.
To make things simple and the code cleaner, the RTC library uses another class, called RtcDateTime, which allows us to create objects to hold the date and time information. This is easier to maintain than having to define a different variable to hold all the parameters from seconds to years.
So, we declare an object of this class and pass the parameters, from year to second, in the constructor. Finally, we call the setDateTime method on the RtcDS3231 object and pass it the RtcDateTime object that holds the date and time information.
All those steps to execute in the setup function are shown bellow:
void setup() {

  Serial.begin(115200);  //Starts serial connection
  rtcObject.Begin();     //Starts I2C

  RtcDateTime currentTime = RtcDateTime(16, 05, 18, 21, 20, 0); //define date and time object
  rtcObject.SetDateTime(currentTime);                           //configure the RTC with object

}
Finally, we will read the current date and time from the RTC in the main loop function. In this simple example, we will poll the RTC every 20 seconds.
To get a the current time and date, we call the GetDateTime method on our previously defined RtcDS3231 object (which we named “rtcObject”). This method will return a RtcDateTime object, as we used before in the setup function.
The RtcDateTime class has a method for getting each of the parameters of date and time. We will use those methods to get them and print them to a string (using the sprintf function).
Once we have all the information of date and time on a string, we send it to the serial port, to get the output on the serial console of the Arduino IDE.
In the end of the main loop, we put a delay of 20 seconds. Check the whole main loop code below:
void loop() {

  RtcDateTime currentTime = rtcObject.GetDateTime();    //get the time from the RTC

  char str[20];   //declare a string as an array of chars

  sprintf(str, "%d/%d/%d %d:%d:%d",     //%d allows to print an integer to the string
          currentTime.Year(),   //get year method
          currentTime.Month(),  //get month method
          currentTime.Day(),    //get day method
          currentTime.Hour(),   //get hour method
          currentTime.Minute(), //get minute method
          currentTime.Second()  //get second method
         );

  Serial.println(str); //print the string to the serial port

  delay(20000); //20 seconds delay

}
Note: Although this example uses a char array, we could also use a string object to print the time and date parameters. Nevertheless, it is important to know that we can use char arrays as strings, which is more efficient. Also, in pure C, there are no objects, so strings are always arrays of chars.
You can check the full source code bellow, with both declarations of the RtcDS3231 objects for versions 1.0.1 and 2.0.0.
#include <Wire.h>       //I2C library
#include <RtcDS3231.h>  //RTC library

//RtcDS3231 rtcObject;              //Uncomment for version 1.0.1 of the rtc library
RtcDS3231<TwoWire> rtcObject(Wire); //Uncomment for version 2.0.0 of the rtc library

void setup() {

  Serial.begin(115200);  //Starts serial connection
  rtcObject.Begin();     //Starts I2C

  RtcDateTime currentTime = RtcDateTime(16, 05, 18, 21, 20, 0); //define date and time object
  rtcObject.SetDateTime(currentTime); //configure the RTC with object

}

void loop() {

  RtcDateTime currentTime = rtcObject.GetDateTime();    //get the time from the RTC

  char str[20];   //declare a string as an array of chars

  sprintf(str, "%d/%d/%d %d:%d:%d",     //%d allows to print an integer to the string
          currentTime.Year(),   //get year method
          currentTime.Month(),  //get month method
          currentTime.Day(),    //get day method
          currentTime.Hour(),   //get hour method
          currentTime.Minute(), //get minute method
          currentTime.Second()  //get second method
         );

  Serial.println(str); //print the string to the serial port

  delay(20000); //20 seconds delay

}
Testing
After uploading the code and opening the serial console from the Arduino IDE, we should get a result similar to the one presented in figure 4.

Final Notes
This was just a simple tutorial about a basic interaction with the DS3231. So, it is similar to an example provided by the author of the library, which I also encourage you to try.
Nevertheless, this RTC has some more functionalities, which will be explored in other tutorials.
Technical details
- ESP8266 libraries: v2.3.0
- RTC library: V1.0.1 / V2.0.0

How to get from Your library the value of separate seconds, minutes, hours, and separately to record them (manually reinstall buttons)????
LikeLiked by 1 person
Hi! First of all, let me clarify that the library is not mine. It is developed by Michael Miller. Check his github page here:
https://github.com/Makuna
To get the separate values, you just need to use the methods of the RtcDateTime class specified in the tutorial.
As in the example, I declared an object of RtcDateTime class called currentTime and called the Second(), Minute() and Hour() methods on it to obtain the values you mention.
I’m assuming you want to record them on the ESP8266. Thus, the best way is to use non-volatile memory, in order to not lose them even if you power off the device.
Check this from the Arduino IDE libraries for the ESP8266, to store values in non-volatile memory:
https://github.com/esp8266/Arduino/tree/master/libraries/EEPROM
I didn’t understand the part of manually reinstall buttons.
Hope it helps
LikeLike
hi. i Set current time date month, etc then time running properly but after i disconnect all circuit at time (2017/03/08 11:58:57) after i connect the circuit on next day then checking time time starts at (2017/03/08 11:58:59) last time i disconnected time.
note: i programmed twice
first time :
void setup() {
Serial.begin(115200); //Starts serial connection
rtcObject.Begin(); //Starts I2C
RtcDateTime currentTime = RtcDateTime(16,05,18,21,20,0); //define date and time object
rtcObject.SetDateTime(currentTime); //configure the RTC with object
}
Second time: i make set time as comment line
void setup() {
Serial.begin(115200); //Starts serial connection
rtcObject.Begin(); //Starts I2C
// RtcDateTime currentTime = RtcDateTime(16,05,18,21,20,0); //define date and time object
// rtcObject.SetDateTime(currentTime); //configure the RTC with object
}
LikeLiked by 1 person
Hi! In the first time the problem was that you reprogrammed the Real Time Clock to the same values. So, every time that program runs from the beginning, it erases any previous values and puts the ones defined in this line of code:
RtcDateTime currentTime = RtcDateTime(16,05,18,21,20,0);
On the second time, it should have worked fine as long as the device has been kept connected to any power source. Did you leave it connected to VCC or with a backup battery (not mentioned in the diagram of figure 2)? Only when powered it keeps counting the time.
LikeLike
Thanks for reply,..
Its CMOS problem after replacing battery it working fine.
now i connect one relay in 12th pin in esp. i want to turn on and turn off the relay based on ON Duration and OFF Duration in loop.
LikeLiked by 1 person
Awesome 🙂
Well, depends on the relay you are using. If it is one of those digitally controllable relays, you just need to use the digitalWrite function to activate/deactivate the pin of the ESP and change the state of the relay:
http://www.ebay.com/sch/i.html?_sacat=0&_sop=15&_nkw=5v+relay+module&rt=nc&LH_BIN=1
Although they are rated for 5V, I think they work well with 3.3v as supply and control voltages.
Just a word of caution, I don’t know if you are experienced in working with the main power supply and relays, but be careful because it is dangerous if you don’t know what you are doing. If you are not experienced, please seek guidance from someone with experience. Stay safe!
LikeLike
I’m Student Relay is not problem here, i need know how to set ON Duration and OFF Duration of relay. Example- ON Duration : 30min OFF Duration : 20min . this process should be in repeat mode.
LikeLiked by 1 person
You can do it in multiple ways.
– Keeping some kind of internal timekeeping that is synchronized with the RTC.
For example, you program the DS3231 to generate an alarm every minute. When the number of minutes with the relay ON is reached, you turn OFF the relay and start counting the minutes again. When the number of minutes with relay OFF is reached, you turn the relay ON and start counting again.
Here is an example on how to set the DS3231 to generate an alarm interrupt each second:
https://techtutorialsx.wordpress.com/2017/02/12/esp8266-ds3231-alarms-once-per-second/
I have only a tutorial for generating an alarm each second, but the RTC also supports generating an alarm each minute:
https://github.com/Makuna/Rtc/wiki/RtcDS3231-AlarmTwo
I’m counting on doing a post on that too but I’m having some busy days.
– Other alternative is programming the alarms for triggering at specific times.
For example, the relay starts working ON at 12:00, so you set an alarm for 12:30. When the alarm triggers, you turn OFF the relay and set a new alarm for 12:50. When it triggers again, you turn it ON and set a new alarm. And so on.
Here you have an example on how to configure the DS3231 to generate an alarm when the seconds match a certain value:
https://techtutorialsx.wordpress.com/2017/02/04/esp8266-ds3231-alarm-when-seconds-match/
But again, the RTC also supports generating an alarm when the minutes match:
https://github.com/Makuna/Rtc/wiki/RtcDS3231-AlarmTwo
In both cases, you may want to check how to use external interrupts with the ESP8266:
https://techtutorialsx.wordpress.com/2016/12/11/esp8266-external-interrupts/
You have other alternatives, but these are two simple ones.
LikeLike
He man.
Well, this is weird for me but I am learning so maybe I do something completely wrong here.
I have tested your little sketch on an empty NodeMCU E12 and it worked.
Now I would like to add it to my sketch that always worked but I get an error.
This error:
no matching function for call to ‘RtcDateTime::RtcDateTime(int, int, int, int, int, int)’ in this line: RtcDateTime currentTime = RtcDateTime(17, 04, 13, 16, 10, 0); //define date and time object
Does this mean I have a conflict with a library or with the extinction code?
Hope it’s an easy one
LikeLiked by 1 person
Hi! Well that’s really weird. But please give me some more information so I can try to reproduce the error.
Are you importing the Wire library in your sketch? Also, are you importing other libraries apart from the ones in this post?
Also, what is the version of your RTC library?
Can you also show me how you are calling that section in your code?
LikeLike
Weird story on this one for me.
I have tested this sketch on an empty NodeMCU E12 without any problems. Used every line like in the description.
Now I would like to ad it on a sketch with an oled display but get this error.
no matching function for call to ‘RtcDateTime::RtcDateTime(int, int, int, int, int, int)’
Because I am just in an learning state I am very confused now.
Do I have a library problem or a conflict on the I2C bus or…
Checked every thing twice but can’t see any wrong typing/mismatch
LikeLiked by 1 person
What going on with this reply?
Every time I have to log in twice but the reply is of gone or it puts an old one in place!
I have placed a reply on what antepher said on April 14, 2017 at 6:29 pm but see now an old reply .
So, here it goes again.
If I put this in the top of the sketch:
#if defined(ESP8266)
#include
#else
#include
#endif
It works on an oled display.
So far so good, but if I use an Liquidcrystel lcd, the lcd doesn’t show anything any more.
It looks to me that this library conflicts with other library’s.
(well, let’s see if this get posted here correctly!)
LikeLiked by 1 person
Hi! It’s weird, I’ve received two similar comments indeed.
Your includes have disappeared, I think WordPress removes stuff between greater than and lesser than signals, probably due to security reasons.
Please share the code again, but remove the greater than and lesser than signals 🙂
LikeLike
Well antepher. Thanks for your response but I have given up on this wordpress (uhm) nonsense. I log in to wordpress, type a reply and have to log in again to see the reply but sometimes it is just gone. About the sketch. It is now more and more one big mess because of all the errors that are coming up. I know that it was/is in developer state but know it is just a mess. Guess I have to start over.
LikeLiked by 1 person
Hi, the error you are getting is really weird. but in fact the constructor doesn’t use int but rather uints:
https://github.com/Makuna/Rtc/blob/master/src/RtcDateTime.h#L12
You can try to add an explicit cast for uint16_t for year and uint8_t for the other parameters, when calling the constructor. Nevertheless it would be weird, I think the cast should be implicit.
LikeLike
Hi antepher.
Sorry for taking your time on this. I have started all over and it is starting to working well. I had some problems with different kind of library’s and that did make up the error, I guess. I was not aware of the different locations. Had one in My documents. One in users/…. and one in the program folder of Arduino. Now I am able to get the day of week and made it all work on a Liquid-crystal LCD. Thanks again. Your page did help me, even with falling and standing up again.
LikeLiked by 1 person
Hi! No problem, always feel free to ask 🙂 I’m glad it is now working.
To avoid that kind of issues, I always try to install the libraries via Arduino IDE Library Manager. It may help you reducing these kind of problems in the future.
That’s the spirit 🙂 many times, when working with microcontrollers and electronics, we face some weird issues. The important is that we try different approaches until we succeed. Many times, starting again from the beginning like you did is the best option.
Good luck with your project!
LikeLike
How to connect the module to pc to program it using Arduino IDE
LikeLiked by 1 person
Hi! Check here on how to connect the ESP8266 to the PC and program it:
The hardware section is related to the ESP-01 board, which has some complexity to connect to a PC. If you are using a NodeMCU board or something similar, you can just connect it using a USB cable and follow the software installation part.
LikeLike
Hi antepher.
I am wondering if you could help me in the right direction of the next issue I have now with the RtcDateTime currentTime.
I would like to set the time with a function in a webpage, like:
var LCDtime =’T’+TODAY+REALTIME;
console.log(‘LCDtime: ‘ + LCDtime);
connection.send(LCDtime);
This sends (as example): LCDtime: T2017, 05, 20, 12, 43, 08 (what I can see in the console of my browser.)
In the seriel monitor I receive (as example): [0] get Text: T2017, 05, 20, 12, 43, 08.
So far so good but how to use this text to set the RtcDateTime currentTime with this text! (without the T off-course)
I have looked all over the web for a direction but because I am just learning I can’t seem to figure this one out. (maybe because I am thinking to simple about this “if serial monitor can show it, can I just set it to the RtcDateTime currentTime?”)
If this question is Inadmissible or to stupid for words, just ignore it but if you have any idea to solve this I would really appreciate your help.
Thanks for your time.
Ray
LikeLike
Hi Ray, always feel free to ask, no question is stupid 🙂
From what I understood, you can access the text in the T2017,05,… format in your code, as a string, right? If the format is always fixed like that, you can first get rid of the “T” and the “,” with the substring method:
https://www.arduino.cc/en/Reference/StringSubstring
So you can use the substring method to get the year, month, day, hour, minute and second in 6 different string variables, and then convert them to ints with the toInt function
https://www.arduino.cc/en/Reference/StringToInt
Then, when you define the date and time object, you use those variables to set the values from year to second.
Hope it helps
LikeLike
Hi antepher.
I was already ‘afraid’ of that kind of conversion.
It was to simple thinking on my side. Thinking there was a kind of magic trick to solve this.
Now I have to figure out a way to do this well because I did this (for example)
int thetime = atoi((const char*)&payload[1]);
But that gives me only 2017.
Any way, thanks a lot for your response and point of direction.
Ray.
LikeLike
Hi antepher,
Attempted your response but are failing big.
As far as I understand it for now, it is not a string!
String stringOne = payload[1]; = conversion from ‘uint8_t {aka unsigned char}’ to ‘String’ is ambiguous
or
char* stringOne = payload[1]; = invalid conversion from ‘uint8_t {aka unsigned char}’ to ‘char*’ [-fpermissive]
And: int thetime = atoi((const char*)&payload[1]); gives me only 2017.
I know I have to learn a whole lot more to understand this.
LikeLike
Hi! you need to figure out the type of your “T2017, 05, 20, 12, 43, 08” in the Arduino variable where you can access it. If it has that format, I think it is either a String or a char array, unless you are converting it for something else.
After figuring that out you need a way to convert it to integers, for passing to the RTC. But I think it will be around parsing a string and converting it to a integers.
Unfortunately I can’t help you much without knowing the type of variable you have in the Arduino. Let me know if you can figure that out.
Where are you getting the payload variable from?
LikeLike
Hi antepher.
Thank you so much for taking the time to think with me on this one.
The payload is coming from a web-page.
For the date:
var d=new Date();
var monthname=new Array(“01″,”02″,”03″,”04″,”05″,”06″,”07″,”08″,”09″,”10″,”11″,”12”);
var TODAY = d.getFullYear() + monthname[d.getMonth()] + d.getDate();
function sendLCDtime(){
var today = new Date();
var h = today.getHours();
var m = today.getMinutes();
var s = today.getSeconds();
h = checkTime(h);
m = checkTime(m);
s = checkTime(s);
var REALTIME = h + m + s;
var LCDtime =’T’+TODAY+REALTIME;
console.log(‘LCDtime: ‘ + LCDtime);
connection.send(LCDtime);
}
The function checkTime does look for the need of a leading zero.
function checkTime(i) {
if (i < 10) {i = "0" + i}; // add zero in front of numbers < 10
return i;
}
(note: I have removed the , to be send but that is not a smart idea so far)
So I thought that it is an array of char but I am wrong I guess because everything I attempted so far failed.
So, you are completely right about knowing the type of variable I have in the Arduino but I don't seem to get it.
I am really sorry to bored you with my problem but thank you in capitals for your time.
THANKS man.
LikeLike
Hi! You’re welcome, I’m happy to help 🙂
Well this is your JavaScript code, right? But what about the ESP866 code? There’s where we need to check the type of your variable, so we can know how to get the the year to second values.
Also, your connection.send function is sending an HTTP request to the ESP, right?
LikeLike
Hi antepher.
On the ESP side I have a webSocket and there is the answer ofcourse?
void webSocketEvent(uint8_t num, WStype_t type, uint8_t * payload, size_t lenght) {
switch (type) {
case WStype_DISCONNECTED:
USE_SERIAL.printf(“[%u] Disconnected!\n”, num);
break;
case WStype_CONNECTED: {
IPAddress ip = webSocket.remoteIP(num);
USE_SERIAL.printf(“[%u] Connected from %d.%d.%d.%d url: %s\n”, num, ip[0], ip[1], ip[2], ip[3], payload);
// send message to client
webSocket.sendTXT(num, “Connected”);
}
break;
case WStype_TEXT:
USE_SERIAL.printf(“[%u] get Text: %s\n”, num, payload);
// on serielmonitor = [0] get Text: T 2017 05 22 21 47 20
if (payload[0] == ‘T’) {
// recieve the LCDtime from the webpage
And after this I fail.
LikeLike
You’re welcome, I’m happy it is working fine and that you are able to show it on the LCD 🙂
Wish you the best luck with your projects! 🙂
LikeLike
Unfortunately I haven’t yet played with websockets, so I may not be of much help. Nevertheless, it seems your payload is an array of bytes, with the content you have sent from the webpage.
I think you may be having difficult with that because you are sending the content as a string instead of as bytes. I can’t confirm this because the code is to complex, but probably your 2017 are 4 bytes in your payload array.
I think you probably have
Payload[0] = “T”;
Payload[1]=” “;
Payload[2]=”2″;
Payload[3]=”0″;
Payload[4]=”1″;
Payload[6]=”7”;
etc…
You can test that and if it is what’s happening, then you are receiving a string byte by byte, where each character is a byte. I would send it as bytes from the server, but that is an architectural decision.
If you want to send it as a string from the webpage, maybe the best approach is to print your payload to a string variable in Arduino, and then use the substring approach that I’ve suggested in the beginning.
But I think the cleanest option is to send bytes. So, instead of doing connection.send(lcdtime), I would do something like (pseudo code, I don’t know the functions):
connection.send(date.year) //year
connection.send(date.month) //month
…
connection.send(time.second) //second
On the Arduino then I would just have:
int year = payload [0];
…
int second = payload[5].
Again, its a suggestion, I can’t make sure it will work.
Hope it helps you going on the right track 🙂 But if you can’t get to a solution, my suggestion would be going a step back and testing things step by step. First of all, learning how to get the year to second values on the webpage code, without the “T” and the “,”. Then, figuring out how to send each of those values through the websocket.
Finally, confirm that you can get them as ints on the Arduino side.
LikeLiked by 1 person
Hi man,
Removing the T is not an option because it is used to point to a function. But… I have finally a point to work on. I now have a string from the payload that looks like this: 2017,05,23,14,31,10
Now I can go with StringSubstring and StringToInt.
Thanks anyway for your time.
LikeLike
Hi man,
Finally coming somewhere with the code.
First I made a String:
String RealTime = String((char*)&payload[1]);
With substring:
String RealYear = (RealTime.substring(0, 4));
String RealMth = (RealTime.substring(5, 7));
String RealDay = (RealTime.substring(8, 10));
String RealHour = (RealTime.substring(11, 13));
String RealMin = (RealTime.substring(14, 16));
String RealSec = (RealTime.substring(17, 19));
And convert it to int:
int inYear = (RealYear.toInt());
int inMth = (RealMth.toInt());
int inDay = (RealDay.toInt());
int inHour = (RealHour.toInt());
int inMin = (RealMin.toInt());
int inSec = (RealSec.toInt());
I have tested it on the serial monitor:
Serial.print(“Int Value of RealYear: “);
Serial.println(RealYear.toInt());
And that gives:
Int Value of RealYear: 2017
Now I have just one little question of how to put these names into the RtcDateTime currentTime?
I hope you can find the time and energies to help me with this last, maybe stupid question.
LikeLiked by 1 person
Hi! Well now it will be easy 🙂 You just do:
RtcDateTime currentTime = RtcDateTime(inYear, inMth,inDay,inHour,inMin,inSec); //define date and time object
rtcObject.SetDateTime(currentTime);
And it should be set on the RTC 🙂
Then you can get the value from the RTC and print it to the serial console to confirm it was correctly set.
LikeLike
Hi antepher,
Amazing. It works like I wanted.
You helped me so very much with this by pointing me in the right direction.
Thank again man, you rock.
(btw: the time is showed on a LCD)
LikeLiked by 1 person
Why not just use the esp8266 NTPClient in the Arduino SDK as opposed to adding hardware?
LikeLiked by 1 person
Hi! I think it is also a valid choice. But depending to the architecture of your solution, you may want to have an RTC for multiple reasons:
– The ESP8266 is a cheap device, you can use it as a microcontroller without using the WiFi functionalities, so the NTPClient can’t be used
– The RTC shown here has more functions than just timekeeping, such as generating programmable alarms, measuring temperature or generating square waves. With a ESP8266 + DS3231 you have a very cheap temperature logger
– The RTC can be battery operated (with a small coin cell) so even if the ESP8266 power goes off, the RTC will still reliably maintain time and date
– If the WiFi signal goes off, we can still make measurements and timestamp them with the values from the RTC, to send them latter to a server when the WiFi signal is restored. You can implement an internal timekeeping function in the ESP8266 that gets sincronized from time to time using NTP to circumvent the problem, but it’s accuracy will depend on many factors (temperature, crystal oscillator, etc..), and the RTC will give much more accurate results. Besides that, internal timekeeping on the ESP8266 will most likely need to be based on interrupts, which may break some opportunities for power saving with sleep modes.
Well, these are some reasons I think that justify the use of an external RTC, but again, as you said, using the NTPClient is also a valid and less expensive choice, if your architecture allows to.
Hope it clarifies 🙂
LikeLiked by 1 person
Hallo from Germany,
Is there a chance that you help me integrate your code into my sketch.
I have an 8dig 7 segment display and would like a simple clock. That is, of course, exactly.
For this would be a comparison by NTP over Wifi ideal. But then later.
Robert
LikeLiked by 1 person
Hi Robert, sorry for the delay.
Unfortunately due to time constraints I can’t help you with actual code, but I can try to give you a help with the architecture and more conceptual stuff. In which parts do you need help?
I haven’t yet used NTP, but the rest of what you want to achieve should be simple.
Best regards,
Nuno Santos
LikeLike
hi
do you have a similar program for micropython?
LikeLiked by 1 person
Hi! Unfortunately I don’t have, I’ve never tested it on MicroPython.
But I think if you ask around the MicroPython forums you may found something. The DS3231 is a commonly used RTC, so my guess is that someone has already developed a library for MicroPython.
Let us know if you find something.
Best regards,
Nuno Santos
LikeLike
Even when I change the data to current time, when I compile it gives me the same time displaying “2009/85/165 37:165:85” do you have any idea why?
LikeLiked by 1 person
Hi,
That’s weird, I never ran into that issue.
Maybe it is some problem while setting the initial values. If you copy and paste exactly my code, does that still happen?
My guesses are either a change in the library API that is causing some configuration problems with the code (what version are you using?) or some electronic problem in the connection that is preventing you from writing the initial content.
Also, do you have an extra DS3231 where you can test to check if there is no defect in the unit you are currenly using?
Best regards,
Nuno Santos
LikeLike
Thanks I fixed it by changing the i2c pins. 🙂
LikeLiked by 1 person
Awesome! Good look with your tests 🙂
LikeLike
hi
i want to use a proximity sensor and want to start counting when the sensor signal is ON and PAUSE when the sensor signal is OFF and counter from the pause point when the sensor is ON again.
how to do that using NodeMcu and RTC
LikeLiked by 1 person
Hi!
Sorry, I’ve never used any proximity sensor on the NodeMCU or any other ESP8266 board.
You will need to find out what proximity sensor device you will use and try to find a suitable Arduino library that also works for the ESP8266.
Best regards,
Nuno Santos
LikeLike
Hi! char str[15]; is not enough for “%d/%d/%d %d:%d:%d”. Please fix it.
LikeLiked by 1 person
Hi! You are right I’ve missed that one, thanks for the warning, I have increased the value 🙂
Best regards,
Nuno Santos
LikeLike
i fallowed the same steps but it is showing 2009/165/165, 13:165:85
how to convert in to real time or where is the error
LikeLike
if want to change the pins of Ds3231 to ESP826 how can i change and how to specify wire .Begin
LikeLike
as per the above code, Diagram when i copied and pasted it is working, now i want to change the pins of SDA/SCl to GPIo4,GPIo0.
when it is changing it is showing same error, how can i change the pins
LikeLiked by 1 person
Hi!
Have you been able to solve the initial problem with the wrong date time values?
Regarding changing the pins, I haven’t tested but from what I’ve seen in this library example, you can call the Wire.begin() method, passing as input the SDA and SCL pins you want to use.
You need to perform this call in the setup function, before the rtcObject.begin call
The examples is here:
https://github.com/Makuna/Rtc/blob/master/examples/DS1307_Simple/DS1307_Simple.ino
Let me know if it works 🙂
Best regards,
Nuno Santos
LikeLike
why the the date and time didnt same….
LikeLiked by 1 person
Hi!
Sorry, didn’t understand what problem you are experiencing. Could you please clarify so we can try to help you? 🙂
Best regards,
Nuno Santos
LikeLike
Hi !
This library work with a ESP32 ?
LikeLiked by 1 person
Hi! unfortunately I haven’t yet had the chance to test it.
Nonetheless, since it works with a generic I2C interface, my guess is that it should work.
Let us know if you have the change to test it 🙂
Best regards,
Nuno Santos
LikeLike
When doing the wiring, What do you call pin 4 and 5? D4 and D5?
Moreover , why is this on pin 4 and 5, can we change that? one more thing on the nodeMcu I can Notice Pins called CLK or SD0 , should we use them instead as there are dedicated for Clock purposes. Thank you
LikeLike
Pins 4 and 5 on ESP8266 are the SDA and SCL pins and are labeled D2 (GPI04) and D1 (GPI05)
LikeLike
How is the made accurate when it’s set at the time of compiling… i.e. there is a delay in the compiling of the sketch so already several seconds will be lost.
LikeLike
Folowed your instruction but only see:
23:04:25.898 -> 2000/1/1 0:0:0
23:04:45.925 -> 2000/1/1 0:0:0
23:05:05.902 -> 2000/1/1 0:0:0
Using an ESP-01 SDA-GP02 and SCL -> GP01
LikeLike