In this tutorial we are going to check how to print the Bluetooth address of a client, when it establishes a serial over Bluetooth connection with the ESP32. The tests were performed using a DFRobot’s ESP32 module integrated in a ESP32 development board.
Introduction
In this tutorial we are going to check how to print the Bluetooth address of a client, when it establishes a serial over Bluetooth connection with the ESP32. For this, we will use the Arduino core and the BluetoothSerial.h library.
We will obtain the address of the client when the client connection Serial Port Profile event is triggered. You can read more about the event and how to handle it on this tutorial.
The tests were performed using a DFRobot’s ESP32 module integrated in a ESP32 development board.
The code
As usual, we will start our code by including the BluetoothSerial.h library, which makes available the Serial over Bluetooth functionalities. After that, we will declare an object of class BluetoothSerial, which we will use to initialize the Bluetooth interface and to configure the event handling function.
#include "BluetoothSerial.h"

BluetoothSerial SerialBT;
Moving on to the Arduino setup function, we will open a regular wired serial connection, to output the results of our program. In this tutorial we are not going to exchange any data with the client over Bluetooth, so all the content will be printed to this interface.
Serial.begin(115200);
After this, we will register the Serial Port Profile Bluetooth events callback function by calling the register_callback method on the BluetoothSerial object. As input, this method receives the events handling function, which we will define below.
SerialBT.register_callback(callback);
To finish the code of the setup function, we will initialize the Bluetooth interface by calling the begin method on the BluetoothSerial object. You can check below the full setup function code, which already includes this initialization and an error check to make sure the procedure didn’t fail.
void setup() {
  Serial.begin(115200);

  SerialBT.register_callback(callback);

  if (!SerialBT.begin("ESP32")) {
    Serial.println("An error occurred initializing Bluetooth");
  } else {
    Serial.println("Bluetooth initialized");
  }
}
Then, we are going to implement the event handling function. As already covered in previous tutorials, this functions needs to have a predefined signature, as shown below:
void callback(esp_spp_cb_event_t event, esp_spp_cb_param_t *param) {
// function implementation
}
Also as already covered here, we can now handle the client connection event by checking if the first argument of the event handling function is equal to the enumerated value ESP_SPP_SRV_OPEN_EVT.
if (event == ESP_SPP_SRV_OPEN_EVT) {
// handling of client connection event
}
In case the event we have received corresponds to the client connection, then we can look to the second parameter of the event handling function to obtain the address of the client that connected.
This second parameter is a pointer to a variable of type esp_spp_cb_param_t, which is a union. The members of this union correspond to structs that contain the parameters of the corresponding Bluetooth SPP event.
Take in consideration that we receive as input of the callback function a pointer to the union, so we need to use the -> operator to access its members.
So, for the ESP_SPP_SRV_OPEN_EVT event, the srv_open member of the union can be used to obtain the event parameters.
The srv_open member corresponds to a struct of type spp_srv_open_evt_param. This struct has a field called rem_bda, which corresponds to the Bluetooth address of the client that connected.
As already covered here, the Bluetooth Device Address is a unique 6 byte identifier assigned to each Bluetooth device by the manufacturer.
So, this rem_bda field corresponds to an array of 6 bytes containing the Bluetooth address of the client. Thus, we can simply iterate it and print each byte in hexadecimal format, separated by colons, which is the typical format used to represent the Bluetooth address [1].
To do it, we will use the printf function of the Serial object, using the %02X format specifier, which prints each byte as a hexadecimal uppercase string with two characters, adding a leading zero padded if needed.
Serial.println("Client Connected has address:");

for (int i = 0; i < 6; i++) {

  Serial.printf("%02X", param->srv_open.rem_bda[i]);

  if (i < 5) {
     Serial.print(":");
  }
}
The full callback function code can be seen below.
void callback(esp_spp_cb_event_t event, esp_spp_cb_param_t *param) {

  if (event == ESP_SPP_SRV_OPEN_EVT) {

    Serial.println("Client Connected has address:");

    for (int i = 0; i < 6; i++) {

      Serial.printf("%02X", param->srv_open.rem_bda[i]);

      if (i < 5) {
        Serial.print(":");
      }

    }
  }
}
The final source code can be seen below.
#include "BluetoothSerial.h"

BluetoothSerial SerialBT;

void callback(esp_spp_cb_event_t event, esp_spp_cb_param_t *param) {

  if (event == ESP_SPP_SRV_OPEN_EVT) {

    Serial.println("Client Connected has address:");

    for (int i = 0; i < 6; i++) {

      Serial.printf("%02X", param->srv_open.rem_bda[i]);

      if (i < 5) {
        Serial.print(":");
      }

    }
  }
}

void setup() {
  Serial.begin(115200);

  SerialBT.register_callback(callback);

  if (!SerialBT.begin("ESP32")) {
    Serial.println("An error occurred initializing Bluetooth");
  } else {
    Serial.println("Bluetooth initialized");
  }
}

void loop() {}
Testing the code
To test the code, simply compile it and upload it to your ESP32. Once the procedure finishes, open the Arduino IDE serial monitor and wait for the Bluetooth initialization procedure to finish.
Then, pair with the ESP32 from a Bluetooth enabled computer. After finishing the pairing procedure, a new serial port should be available on the computer.
After identifying the serial port that corresponds to your ESP32 (if you are on Windows, you can use the device manager to check which serial ports are operating over Bluetooth), use a serial program to establish a connection to that port.
You can use a program such as Putty or you can open a new instance of the Arduino IDE and use the serial monitor. If you use this second approach, don’t forget to keep the wired serial connection also opened, since the output of our program will be printed there.
So, after the connection is established, check the output printed to the wired connection. You should see the Bluetooth address of the client, as shown in figure 1.
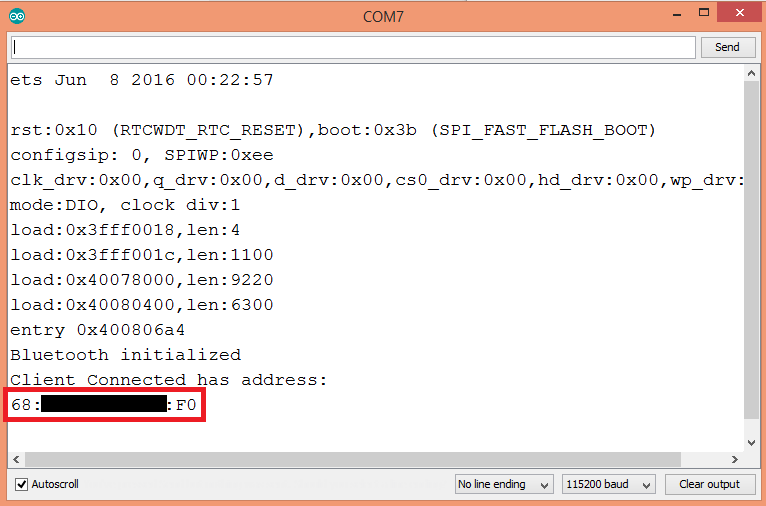
Figure 1 – Output of the program.
If you compare the printed value against the Bluetooth adapter address listed on your computer, they should match, as shown in figure 2.

Figure 2 – Bluetooth address of the computer used on the tests of this tutorial.
Related posts
- ESP32 Arduino Serial over Bluetooth: Client connection event
- ESP32 Arduino Serial over Bluetooth: Client disconnection event
- ESP32 Arduino Bluetooth Classic: Controlling a relay remotely
- ESP32 Arduino Bluetooth: Finding the device with Python
- ESP32 Arduino Serial over Bluetooth: Receiving data
- ESP32 Arduino: Getting the Bluetooth Device Address
- ESP32 Arduino Bluetooth classic: Getting started
References
[1] https://macaddresschanger.com/what-is-bluetooth-address-BD_ADDR
Hi, is it possible that we query the client name as well?