The objective of this post is to explain how to get measurements from the ESP32 internal Hall sensor. The tests of this tutorial were performed using a DFRobot’s ESP-WROOM-32 device integrated in a ESP32 FireBeetle board.
Introduction
The objective of this post is to explain how to get measurements from the ESP32 internal Hall sensor, using the ESP32 Arduino core.
An Hall sensor is a device that, when under the effect of a magnetic field, outputs a proportional voltage [1]. This is one of the many sensores included in the ESP32 microcontroller [2].
We will first obtain the values when no magnetic field is nearby and then test the results when we approximate a magnet to the ESP32. The code shown here is based on this example from the Arduino core, which I encourage you to try.
The tests of this tutorial were performed using a DFRobot’s ESP-WROOM-32 device integrated in a ESP32 FireBeetle board.
The code
For this ESP32 tutorial, we will not need any library includes. Also, the setup function will be very simple and basically consists on opening a serial communication, so we can then send the Hall sensor measurements to a computer.
void setup() {
  Serial.begin(115200);
}
The rest of the code will be done in the main loop function. We will want to do a periodic measurement of the sensor values. But first, we declare an integer variable, to hold the result of each measurement.
int measurement = 0;
Then, to obtain the actual measurement, we simply call the hallRead function, which will return the value from the Hall sensor. Naturally, we will store the value in our previously declared variable.
measurement = hallRead();
After having the value, we will print it to the serial port, so we can then check the value using the Arduino IDE serial monitor.
Serial.print("Hall sensor measurement: ");
Serial.println(measurement);
Finally, we do a delay before getting to the next cycle of our measurement loop. To do so, we simply call Arduino’s delay function, passing as input the number of milliseconds to wait. In this example we will delay for 1 second, but you can play with other values.
delay(1000);
The full source code for this ESP32 tutorial can be seen bellow.
void setup() {
  Serial.begin(115200);
}

void loop() {

    int measurement = 0;

    measurement = hallRead();

    Serial.print("Hall sensor measurement: ");
    Serial.println(measurement);

    delay(1000);
}
Running the code
To test the code, just compile it and upload it to the board using the Arduino IDE. Then, open the serial monitor and set the baud rate to the same value defined in our setup function.
Without any magnetic field near the ESP32, you should get some measurements near 0, as can be seen bellow in figure 1.
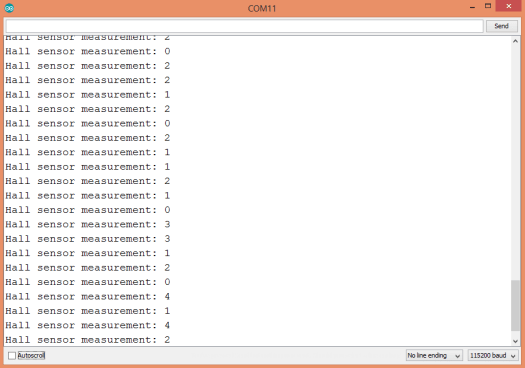
Figure 1 – Hall sensor measurements without magnetic field near by.
Then grab a magnet and put it near the ESP32 chip. Depending on the magnetic poll that is near, the values of the Hall sensor measurements should either increase or decrease, as shown in figure 2.

Figure 2 – Value from the ESP32 Hall sensor increased.
References
[1] https://sensing.honeywell.com/hallbook.pdf
[2] http://www.espressif.com/en/products/hardware/esp32/overview

Very good. It works as stated. I wonder why they included the hall sensor in the IC. Any application I’ve seen the hall is remote. Cool experiment though.
LikeLiked by 1 person
Hi! Thanks 🙂
I think that given the price of these kind of devices and the cost of integrating them in chips, we will be seeing more and more microcontrollers shipping with additional hardware such as this. But it’s just a guess.
Regarding the applications, maybe it is related to allow the applications to be aware of the surrounding conditions. The ESP32 has both a hall sensor and a temperature sensor. Magnetic fields and temperature are two factors that may impact the operation of some electronic components, and thus being aware of them may be useful to understand some failing conditions of devices, or trigger some warnings. But it’s again another guess.
Would like to ear more from others about their opinion on that, it is indeed a good question 🙂
Best regards,
Nuno Santos
LikeLike
any idea how to use external hall effect sensor with esp32?
LikeLike
hi is it possible to wake up ESP32 from deep sleep using hall sensor?
LikeLiked by 1 person
Hi!
Sorry, I haven’t yet worked with the deep sleep functionality so I’m not sure if that is possible.
My suggestion to try to find an answer quickly is to look in the Arduino core GitHub page for some information and if there’s none, to ask around there.
Hope you are able to find an answer 🙂
Best regards,
Nuno Santos
LikeLike
how i can send the hall measurement whit built-in BLE to a smart phone app
LikeLiked by 1 person
Hi!
Unfortunately I’ve never worked with BLE, just Bluetooth classic, so I cannot help much
Nonetheless, there are some BLE examples on the Arduino core that might help:
https://github.com/nkolban/ESP32_BLE_Arduino/tree/b232e7f5f0e87f36afbc2f4e03a2c49c48dd47bc
Hope this helps 🙂
Best regards,
Nuno Santos
LikeLike