The objective of this post is to explain how to send data to the ESP32 using the Bluetooth RFCOMM protocol. The tests of this tutorial were performed using a DFRobot’s ESP-WROOM-32 device integrated in a ESP32 FireBeetle board.
Introduction
The objective of this post is to explain how to send data to the ESP32 using the Bluetooth RFCOMM protocol.
RFCOMM allows the emulation of serial ports [1] over Bluetooth, and thus we can use it to exchange data, for example, with a computer program. In our case, we will be using Pybluez, a Python module that allows to use the Bluetooth functionalities of our machine. Please consult this tutorial which explains how to set Pybluez.
For the ESP32 part, we will be using the BTstack library and the ESP IDF. Please check this previous tutorial for a detailed explanation on how to set the BTstack library on the IDF.
The code shown here is based on the spp_counter example from the BTstack library. It is a more complete example that covers some more functionalities and I encourage you to try it.
The tests of this tutorial were performed using a DFRobot’s ESP-WROOM-32 device integrated in a ESP32 FireBeetle board.
The Python code
As usual, we will start by doing the import of the Pybluez module, so we can get the functions needed to access all the Bluetooth functionality.
from bluetooth import *
Next we will create an object of class BluetoothSocket, which will allow us to establish the communication with our ESP32. In the constructor, we need to specify the transport protocol. In our case, we will pass RFCOMM, since it is the protocol we want to use.
BTsocket=BluetoothSocket( RFCOMM )
Next we need to connect to the Bluetooth device by calling the connect method on our BluetoothSocket object. This method receives as input both the address of the Bluetooth device and the port/channel where it is available.
If you have followed this previous tutorial, you should already know the Bluetooth address of your ESP32. If not, we will have a way of discovering upon executing the ESP32 code from this tutorial, which we will specify in the next section. We will try to connect to channel 1, since it will be the one we will specify for the ESP32.
BTsocket.connect(("30:AE:A4:03:CD:6E", 1))
Now we will send a message to the ESP32 by calling the send method of the BluetoothSocket object. This function receives as input the string to be sent.
BTsocket.send("Hello world")
To finalize, we will close the connection by calling the close method, which receives no arguments. The full source code can be seen bellow and already includes this call. As can be seen, the code for this is very simple.
from bluetooth import *

BTsocket=BluetoothSocket( RFCOMM )

BTsocket.connect(("30:AE:A4:03:CD:6E", 1))

BTsocket.send("Hello world")

BTsocket.close()
The ESP32 code setup
If you have been following the previous tutorials about the ESP32 and the Bluetooth, you should already have an Hello_World BTstack project configured. You can keep using that project’s configurations. If you haven’t yet a project configured, please consult this previous post.
We start our code by including the btstack.h header file, which will be needed for our program.
#include "btstack.h"
Next we need to specify the header of a function that will be the handler executed upon receiving packets. As said in previous tutorials, this is a very low level API, so we need to implement these kind of handling functions. Although it makes the code more difficult to learn, it will also give us much more freedom and control, which will be beneficial in the long term.
This function needs to follow the prototype specified here, as the btstack_packet_handler_t type. So, this function will receive as input the packet type, the channel, a pointer to the actual packet and the size of the packet.
static void packet_handler (uint8_t packet_type, uint16_t channel, uint8_t *packet, uint16_t size);
Next we also need to declare a variable of type btstack_packet_callback_registration_t, which is declared here. We will later assign the previous packet handler function to a field of this structure called callback, which is precisely of type btstack_packet_handler_t, mentioned in the previous paragraph.
static btstack_packet_callback_registration_t hci_event_callback_registration;
We will handle the implementation of the packet handling function in other section of this tutorial.
The ESP32 main function
First we need to register our handler function for the Bluetooth HCI layer events. As we will see in the next sections, we need to handle the reception of the RFCOMM connection and accept it, so we can start receiving information from the Python program.
So, as we said before, we will assign the address of our packet handler function to the callback field of the btstack_packet_callback_registration_t variable we specified.
hci_event_callback_registration.callback = &packet_handler;
After that, we register the packet event handler function by calling the hci_add_event_hander function, which receives a pointer to a btstack_packet_callback_registration_t structure. Naturally, we will use the structure to which we assigned the packet handler function.
hci_add_event_handler(&hci_event_callback_registration);
Next we call the l2cap_init function, to initialize the L2CAP layer of the Bluetooth protocol. The same way, we call the rfcomm_init function to initialize the RFCOMM layer of the protocol, which we will use to establish the communication.
l2cap_init();
rfcomm_init();
Then we need to register our RFCOMM service. To do so, we call the rfcomm_register_service function, which receives as input a function of type btstack_packet_handler_t. Note that this is the same type of the function we declared in the beginning of our code, so we will reuse it and implement all the functionality for also handling the RFCOMM packets there.
The rfcomm_register_service function also receives as input the channel for the RFCOMM communication and the maximum frame size. Remember that in the Python code we used the channel 1, so it is the same we will specify here.
rfcomm_register_service(packet_handler, 1, 0xffff);
Next in our main function, we will initialize the SDP layer with the sdp_init function, and we will make the device discoverable with the gap_discoverable_control function.
Note that although we are initializing SDP, we are not registering our RFCOMM as discoverable for keeping this tutorial simple. This is the reason why we directly connected to the device using its address in the Python code, instead of first making a lookup for the available services.
We are also not setting the local name of the device so when we pair with it from the computer its address is displayed. That way, you will be able to retrieve this value and use it on the Python code.
sdp_init();
gap_discoverable_control(1);
To finalize, we will power on the Bluetooth hardware controller with a call to the hci_power_control function.
hci_power_control(HCI_POWER_ON);
The packet handler function
Now we will specify the packet handler function. First we will need to declare a variable to hold the channel id for when we receive the RFCOMM connection.
uint16_t rfcomm_channel_id;
Remember that in the prototype of our function one of the input parameters was the packet type. So we will use that value to look for a specific packet type we want. The first one we will search is the RFCOMM incoming connection event. We need to accept the connection upon receiving it.
This will correspond to a HCI packet event packet. Fortunately there are some defines on this library that help us finding the correct packet type. In this case we will use the HCI_EVENT_PACKET define.
Nonetheless, we still just know that it is a HCI event packet. To find the type of packet, we call the hci_event_packet_get_type function, passing as input the pointer for the packet. Remember that this pointer was also an input parameter for our packet handler function.
Once we get the event type, we can check if it is a RFCOMM incoming connection event. Again, we have the RFCOMM_EVENT_INCOMING_CONNECTION define to find this type of event.
 if (packet_type == HCI_EVENT_PACKET
&& hci_event_packet_get_type(packet) == RFCOMM_EVENT_INCOMING_CONNECTION) {

//Event handling code here

}
The handling of this event will correspond to getting the RFCOMM channel id, by calling the rfcomm_event_incoming_connection_get_rfcomm_cid function and passing as input the pointer to the packet.
rfcomm_channel_id = rfcomm_event_incoming_connection_get_rfcomm_cid(packet);
Final, we use the channel id retrieved to accept the connection, by calling the rfcomm_accept_connection function.
rfcomm_accept_connection(rfcomm_channel_id);
The other type of packet that we need to look for is a RFCOMM data packet. We have the RFCOMM_DATA_PACKET define for the corresponding packet type value. If we get that type of packet, then we can iterate over the packet received and print it to the serial port.
Note that we receive a pointer to the packet, so we can access it as an array. Since we also have the size of the packet (another parameter of the packet handling function), we know when to stop to avoid reading outside the boundaries of the array.
if (packet_type == RFCOMM_DATA_PACKET){

   printf("Received data: '");

   for (int i=0;i<size;i++){
       putchar(packet[i]);
   }

   printf("\n----------------\n");
}
The final code
You can check the final source code for the ESP32 bellow.
#include "btstack.h"

static void packet_handler (uint8_t packet_type, uint16_t channel, uint8_t *packet, uint16_t size);

static btstack_packet_callback_registration_t hci_event_callback_registration;

static void packet_handler (uint8_t packet_type, uint16_t channel, uint8_t *packet, uint16_t size){

   uint16_t rfcomm_channel_id;

   if (packet_type == HCI_EVENT_PACKET
       && hci_event_packet_get_type(packet) == RFCOMM_EVENT_INCOMING_CONNECTION){

       rfcomm_channel_id = rfcomm_event_incoming_connection_get_rfcomm_cid(packet);
       rfcomm_accept_connection(rfcomm_channel_id);

     }else if (packet_type == RFCOMM_DATA_PACKET){

        printf("Received data: '");

	    for (int i=0;i<size;i++){
             putchar(packet[i]);
         }

	      printf("\n----------------\n");
    }
}

int btstack_main(int argc, const char * argv[]){

    hci_event_callback_registration.callback = &packet_handler;
    hci_add_event_handler(&hci_event_callback_registration);

    l2cap_init();

    rfcomm_init();

    rfcomm_register_service(packet_handler, 1, 0xffff);

    sdp_init();

    gap_discoverable_control(1);

    hci_power_control(HCI_POWER_ON);

    return 0;
}
Testing the code
To test the whole system, we first need to compile and upload the code to the ESP32. Please consult this previous tutorial, which explains in detail how to compile and flash the FireBeetle board.
Note that after uploading the code, you may have to reset it or plug and re-plug the board so it leaves the program download mode. After successfully running the code, you should be able to detect it from your computer, as shown in figure 1.
Note that since we didn’t specify a display name, we see the name BTstack followed by the address of the device. This is the address you should use on your Python code.
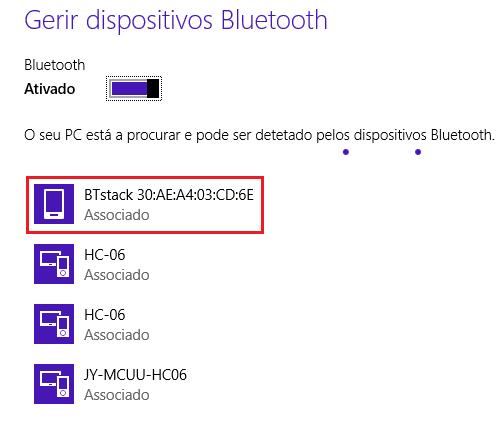
Figure 1 – ESP32 being detected by Windows as Bluetooth device.
Upon pairing with the device on your computer, open a serial monitor tool to receive data from the ESP32. In my case, I’m using the Arduino IDE serial monitor since I’m not being able to receive the data on the IDF serial monitor.
After receiving the “BTstack up and running” message, run the Python Pybluez code, in order to communicate with the ESP32 using RFCOMM. You should get a result similar to figure 2. Note that I ran the Python code twice in that example, which is why two “Hello World” messages are shown.

Figure 2 – ESP32 printing the data received through RFCOMM.
Important: At the time of writing, the ESP32 doesn’t yet support storing in persistent memory the link keys exchanged in the pairing process. So, they are stored in RAM and thus are lost when the device is reset. So, if you reset the ESP32, it will still appear as paired with the computer, but if you run the Python code it will not be able to establish the BluetoothSocket connection. In order to solve this, you need to forget the device and repair it again. Please consult this GitHub issue to check the thread about it.
Related posts
- ESP32 Bluetooth: Using the BTstack library
- ESP32 Bluetooth: Finding the device with Python and BTStack
References
[1] http://www.amd.e-technik.uni-rostock.de/ma/gol/lectures/wirlec/bluetooth_info/rfcomm.html

Hi,
I’d like to use a ESP32 with a SerialTerm in my Android Phone with Classic Bluetooh, no BLE.
But the conexion is lost and it is impossible for using it.
Is there a solution for keeping the link between esp32 and phone or other device ?
Thanks a lot.
LikeLiked by 1 person
Hi! Sorry, I’ve never tested it with an Android Phone and that software.
But were you able to test with the Python code and a computer or do you also have problems on that environment?
Best regards,
Nuno Santos
LikeLike
No working in this conf. Any help ?
Debian 9 64bit , python 2.7 and ESP32-WROOM-32
ESP32 log > https://pastebin.com/kWbnzdEZ
Python log > https://pastebin.com/V4SFKKS6
LikeLiked by 1 person
Hi! I did all the tests on Windows, so it may be a linux specific issue.
Can you test it on Windows to see if the problem persists, to confirm if the problem is related with the operating system?
Best regards,
Nuno Santos
LikeLike