The objective of this post is to explain how to install the drivers for DFRobot’s FireBeetle ESP32 board and create a simple “Hello World” program with the Arduino development environment.
Introduction
The objective of this post is to explain how to install the drivers for DFRobot’s FireBeetle ESP32 board and create a simple “Hello World” program with the Arduino development environment. So, we are assuming a previous installation of the ESP32 support on the Arduino IDE. If you haven’t done it yet, please check this previous post and the instructions at the GitHub page.
For more resources on the FireBeetle ESP32 board, you can consult the product Wiki. For more tutorials on the ESP32, the Microcontroller of the board, please check here.
Installing the drivers
At the time of writing, we need to manually install the driver for the FireBeetle ESP32 to be recognized as a device on our computer. So, if you connect the board to your computer and open the list of devices available on the Arduino IDE, no COM port will be shown for the board.
Important: At the time of writing this tutorial, the driver signature for this device is not yet recognized by Windows. So, if you are on Windows 8 like me, you will have to manually disable the driver digital signature validation in order to install it. Note that this is an advanced procedure that is outside the scope of this post. Nevertheless, you can check here a detailed guide on how to perform this procedure. Note however that disabling driver digital signature validation on drivers may put your system at risk. Please advance at your own responsibility and be careful.
So, the first step is to download the driver from DFRobot’s website. You can find the link at the FireBeetle ESP32 Wiki. Nevertheless, the file is hosted here. Note that the file will not be automatically downloaded, and you will end up in a webpage with the actual driver content, as shown in figure 1.

Figure 1 – FireBeetle ESP32 driver.
Now, you will have to copy it’s contents and save them as a .inf file, which is a type of file that contains the information needed to install a driver [1]. The easiest way is pasting it in Notepad ++, which already has that type of file available when saving it, as shown in figure 2.

Figure 2 – Saving the file with .inf extension.
Note that by default Notepad++ will append a .ini extension on the name of the file when you choose this option. We need to change it to .inf. You can name the file FireBeetle, as shown in figure 3.

Figure 3 – Saving the driver file.
Note that upon saving the file, it should have an icon similar to the one shown in figure 3, indicating the it is indeed a .inf file.
![]()
Figure 3 – Icon of the file with the .inf extension.
To install the file, simply right click it and click install, as shown in figure 4 (my Windows is in Portuguese).
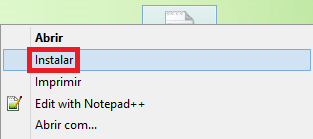
Figure 4 – Installing the driver file.
As said in the beginning of this section, you may need to disable driver signature validation, or you will receive an error. Upon clicking the install button (with the driver validation disabled) and after a while, a success message will be shown, as illustrated in figure 5. Note that on Windows 8 no menu is shown during the installation.

Figure 5 – Successful installation of the driver.
Now, in the Arduino IDE, a new device should be shown in the tools menu, on the port section. As shown in figure 6, mine is on COM11. Yours may be in a different one. Select it so we can upload programs on the following section.

Figure 6 – Selecting the FireBeetle ESP32 COM port on the Arduino IDE.
The Hello World program
We will now write a very simple “Hello World” program, which will print a message to the serial port, so we can see it with the Arduino IDE serial monitor.
You can check bellow the code for the “Hello World” message. In the setup function we do a small delay and then we open a serial connection with a baud rate of 115200. Then, in the main loop function, we print the message every 2 seconds (the delay function is specified in milliseconds).
void setup() {

  delay(1000);
  Serial.begin(115200);

}

void loop() {

  Serial.println("Hello from FireBeetle ESP32 board");
  delay(2000);

}
Now, to upload the program to the board, we need to choose it on the Arduino IDE, so the upload specifications are correct. As can be seen in figure 7, the FireBeetle ESP32 board is already supported on the ESP32 libraries.

Figure 7 – Selecting the FireBeetle ESP32 board on the Arduino IDE.
After selecting the board, click the compile and upload button and expect for the upload to finish. You should get a result similar to figure 8 after the upload is finished.

Figure 8 – Successful upload of the program to the FireeBeetle board.
The device will not automatically start running the new program. So, unplug the USB cable and plug it back again, so it boots again now running the program. Next, open the Arduino IDE serial monitor and select a baud rate of 115200. After the initial delay, the message should now be printed every 2 seconds, as shown in figure 9.
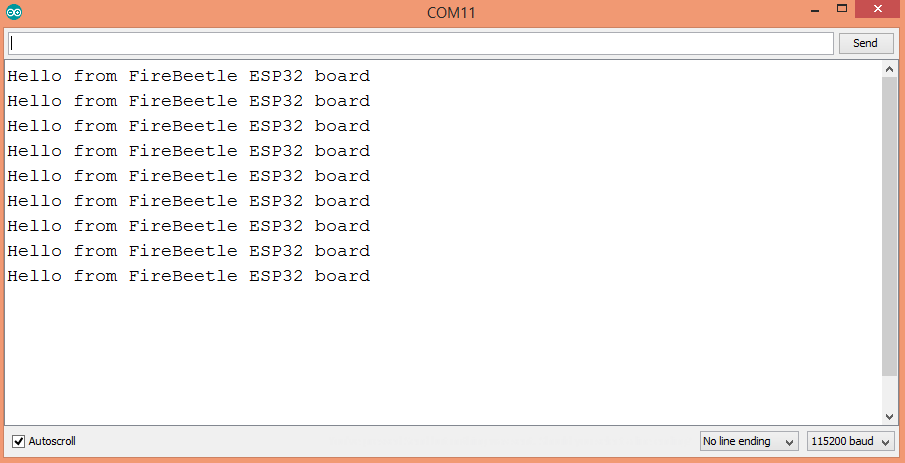
Figure 9 – Hello World message being printed in the serial console.
If you want, you can use other software to establish a serial connection to the FireBeetle ESP32 board. In figure 10 the connection was established using Putty. We see the same “Hello World” message.

Figure 10 – Connecting to the FireBeetle ESP32 board using Putty.
Related content
- FireBeetle ESP32 product page
- FireBeetle ESP32 Wiki
- Arduino IDE ESP32 support installation instructions
- ESP32 tutorials
Related posts
References
[1] https://docs.microsoft.com/en-us/windows-hardware/drivers/install/overview-of-inf-files
Pingback: ESP32 Arduino: Getting started with WiFi | techtutorialsx
Pingback: ESP32 Arduino: Getting started with WiFi | techtutorialsx
Hello, although I followed all the instructions, a port was not opened for my fireBeetle esp32 card. There were no com plugins. While the blue light on the card is flashing intermittently, the red light is flashing rapidly.
Unfortunately I couldn’t find any other solution.