The objective of this tutorial is to explain how to make HTTP POST requests using the ESP32 and the Arduino environment support. We will use the HTTPClient.h library to hide the low level implementation details.
Introduction
The objective of this tutorial is to explain how to make HTTP POST requests using the ESP32 and the Arduino environment support. We will use the HTTPClient.h library to hide the low level implementation details.
So, we don’t need to worry about building the HTTP protocol on top of a socket connection, since we will have methods available to deal with that. For sending HTTP GET requests with the same library, please check this previous tutorial.
Important: At the time of writing this tutorial, the HTTPClient.h library had just been merged to the ESP32 libraries for the Arduino environment. So, you will most likely need to update to for the latest code available. Check here how to do it.
If you prefer a video version of this tutorial, please check below.
The code
The initial portion of the code will be the same needed for the HTTP GET requests with the ESP32. So, we will start by including the libraries needed, declaring some global variables to hold the WiFi network credentials and, in the Arduino setup function, connect to the WiFi network. If you need a detailed guide on how to connect to a WiFi network with the ESP32, please check this previous tutorial.
Important: At the time of writing, there was the need for making a small delay before calling the WiFi.begin function, for connecting to the WiFi network. Before updating the ESP32 libraries, this delay was not needed. Nevertheless, this may eventually not be needed anymore when you test the code, so you can play with this delay and check if the ESP32 can connect to the WiFi network without it. You may also need to increase it if you experience problems with the connection.
#include <WiFi.h>
#include <HTTPClient.h>

const char* ssid = "yourNetworkName";
const char* password =  "yourNetworkPassword";

void setup() {

  Serial.begin(115200);
  delay(4000);   //Delay needed before calling the WiFi.begin

  WiFi.begin(ssid, password);

  while (WiFi.status() != WL_CONNECTED) { //Check for the connection
    delay(1000);
    Serial.println("Connecting to WiFi..");
  }

  Serial.println("Connected to the WiFi network");

}
After the initialization code, we will go for the main loop, where we will write the code needed for making the HTTP POST requests. We will declare an object of class HTTPClient, which makes available the methods needed for handling the HTTP protocol.
Then, we call the begin method on the previously declared object and pass as input the URL for the website where we want to make the POST request. We will use a fake online REST API website, suitable for testing. You can check it here.
HTTPClient http;

http.begin("http://jsonplaceholder.typicode.com/posts"); //Specify destination for HTTP request
After that, we will call the addHeader method, which will allow us to specify the HTTP request headers. In this case, we will define the content-type header, which specifies the media type of the body of the request [1] we will send. We will specify it as “text/plain“, since we are only going to send a simple textual message, without any particular format.
As can be sen bellow, this method receives as first input the header we want to specify, and as second input its value.
http.addHeader("Content-Type", "text/plain"); //Specify content-type header
Now, to send the actual HTTP request, we call the POST method, passing as input the body content of the request. We will send a simple message just for illustration purposes. Since we are contacting a fake API, it will always accept out content.
This method will return the HTTP response code, which we will store in a variable. Note that if the value returned is lesser that zero, then an error occurred on the connection. If it is greater than zero, then it’s a standard HTTP code.
int httpResponseCode = http.POST("POSTING from ESP32"); //Send the actual POST request
Since we stored the HTTP response code, we will use it for error handling, as we will see the code bellow. If our request was successfully sent, we will get the HTTP answer by calling the getString method. Then, we will print the answer and the HTTP code. In case of error, we will print a informative message.
if(httpResponseCode>0){

    String response = http.getString();  //Get the response to the request

    Serial.println(httpResponseCode);   //Print return code
    Serial.println(response);           //Print request answer

}else{

    Serial.print("Error on sending POST: ");
    Serial.println(httpResponseCode);

}
Finally, we will call the end method on our http object to free the resources. This call is important and mustn’t be forgotten. Check the full source code bellow, which already includes this call. It also includes a delay between each request, and a conditional block to check if we are still connected to the WiFi network before sending a request.
#include <WiFi.h>
#include <HTTPClient.h>

const char* ssid = "yourNetworkName";
const char* password =  "yourNetworkPassword";

void setup() {

  Serial.begin(115200);
  delay(4000);   //Delay needed before calling the WiFi.begin

  WiFi.begin(ssid, password);

  while (WiFi.status() != WL_CONNECTED) { //Check for the connection
    delay(1000);
    Serial.println("Connecting to WiFi..");
  }

  Serial.println("Connected to the WiFi network");

}

void loop() {

 if(WiFi.status()== WL_CONNECTED){   //Check WiFi connection status

   HTTPClient http;

   http.begin("http://jsonplaceholder.typicode.com/posts");  //Specify destination for HTTP request
   http.addHeader("Content-Type", "text/plain");             //Specify content-type header

   int httpResponseCode = http.POST("POSTING from ESP32");   //Send the actual POST request

   if(httpResponseCode>0){

    String response = http.getString();                       //Get the response to the request

    Serial.println(httpResponseCode);   //Print return code
    Serial.println(response);           //Print request answer

   }else{

    Serial.print("Error on sending POST: ");
    Serial.println(httpResponseCode);

   }

   http.end();  //Free resources

 }else{

    Serial.println("Error in WiFi connection");

 }

  delay(10000);  //Send a request every 10 seconds

}
Testing the code
The procedure for testing the code is the same as usual. Just upload the code for the ESP32 using the Arduino IDE and open the serial monitor to check the output. You should get something similar to figure 1.
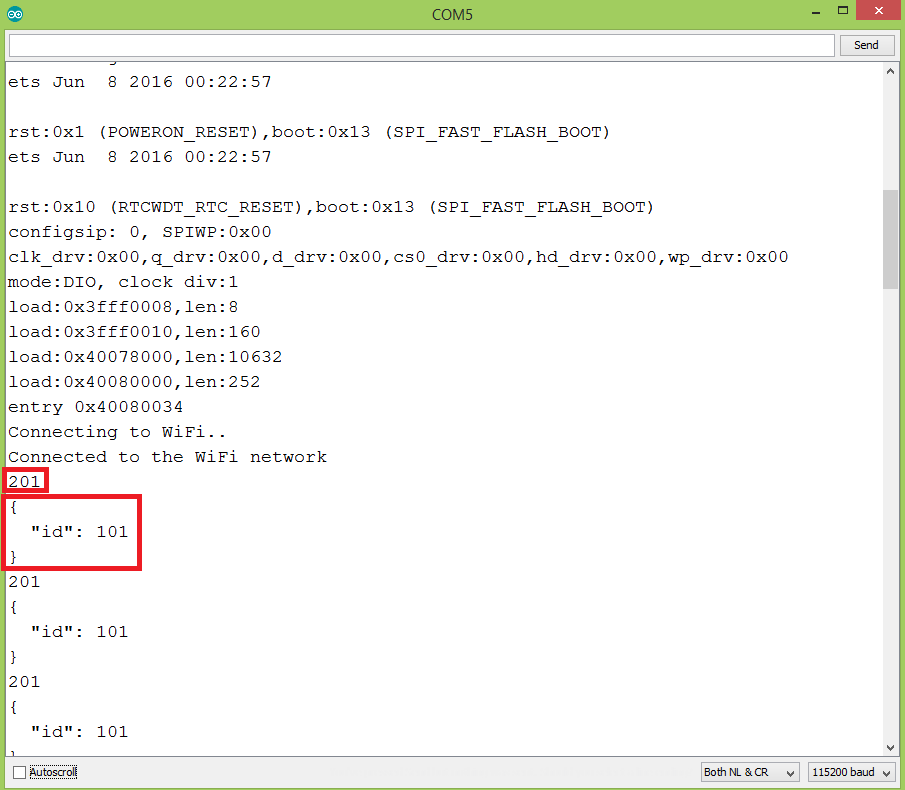
Note that a HTTP 201 code is returned, which corresponds to “created” [2]. This means a resource was created in the server, which is the expected simulated behavior since we are doing a POST.
So, the answer includes an ID, telling us the identifier of the new resource. Since this is a fake testing website, nothing is happening on the backend and this is a simulated response, so all the following POST requests will return the same ID. Also, there is no checking for the structure of the content we are sending.
Related Posts
Related Videos
References
[1] https://www.tutorialspoint.com/http/http_header_fields.htm
[2] https://www.w3.org/Protocols/rfc2616/rfc2616-sec10.html
hi Mr antepher
thank you for your tutorial
I can send my data up to 13 Kb with 210 String lines
but after that this error (Error on sending POST:-1) is comps up
Is there any restriction on sending data?
Hello,
I like your tutorials but the code is not working for me.
I changed the ssid and password (of course), and used your url for the http.begin(). But the output is always “Error on sending POST: -2”.
It would be great if you could help me.
Best regards,
Jelly314
Hi Antepher,
Great tutorial. Thanks for posting this and the other tutorial on GET.
I am doing a project with my daughter. The objective of the project is to take a picture using ESP32, POST the image captured to a service hosted on AWS. The service on AWS is trained to differentiate Garbage, Recycle and Compost. The service takes the image as an input and returns the type (Garbage or Recycle or Compost). Based on the return type, we light up different colored LED lights.
I am able to connect my ESP32 to the internet and capture an image. I am looking for guidance on how to pass the image to the AWS service. Appreciate any insight.
I copied paste your code. I saw that there was a memory leak (500 B/request).
Do you have a solution?
Hello, I had already implemented this tutorial before, I had to make a free server, since I couldn’t test it locally, do you know how to use it with localhost?
Hey. I have used part of the code to perform POST requests in my program. I was experiencing strange issues with the program hanging after a day or two. Turned out HttpClient was causing memory leaks. By reusing the same global HttpClient instead of creating new one each time solved the issue for me.