The objective of this post is to explain how to configure additional mDNS services to be advertised by our LinkIt Smart Duo.
Introduction
The objective of this post is to explain how to configure additional mDNS services to be advertised by the LinkIt Smart Duo.
By default, the LinkIt Smart comes with some services which are advertised using Avahi. Avahi implements the zero configuration networking, allowing for the resolution of locally defined names into IPs.
To keep things simple, we will use the WinSCP program to connect to the LinkIt Smart and edit some necessary files on the device. You can check a detailed tutorial on using WinSCP to exchange files with the LinkIt Smart Duo here.
Configuring the new service
So, run WinSCP and connect to the LinkIt Smart Duo. By default, we will start the connection in the /root directory of the LinkIt Smart. If you haven’t yet uploaded/created files on that directory, it should be an empty one.
From that directory, on the WinSCP GUI, click on the icon to move one directory up, as shown in figure 1.

Figure 1 – Root directory of the LinkIt Smart.
You should now be on the “/” directory. Click on the etc folder, as shown in figure 2.
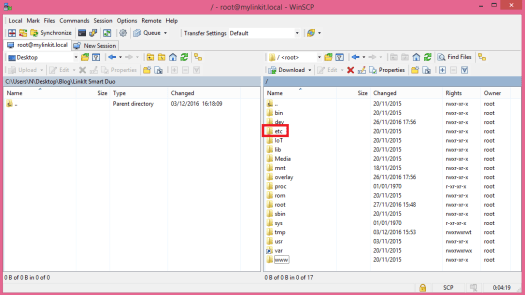
Figure 2 – Contents of the “/” directory of the LinkIt Smart.
From there, choose the avahi folder, as shown in figure 3.

Figure 3 – Contents of the LinkIt Smart /etc directory.
On that folder, you should see another folder, called services, and a file called avahi-daemon.conf, as shown in figure 4.
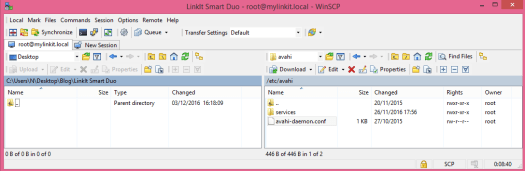
Figure 4 – Contents of the /etc/avahi directory.
A daemon is a program that runs continuously [1] in the background and performs certain actions at predefined times or in response to certain events [2].
So, the Avahi daemon running on the LinkIt Smart implements the Zeroconf architecture [3], meaning that it is responsible for handling mDNS [4]. So, it allows the LinkIt Smart to make the local domain name resolution and service advertisement / discovery without the need for a central infrastructure on the network.
When starting, the Avahi daemon reads the configurations from the avahi-daemon.conf file present in this directory [2] and the files specified on the services folder, which are then advertised on the network using mDNS.
You can check the contents of the file by clicking on it on the WinSCP GUI. Here there’s an explanation on the sections of the file. But be careful to not change anything for this tutorial.
After that, click on the services folder. You should now see 4 files with the .service extension, which specify services available on the LinkIt Smart, as shown in figure 5.

Figure 5 – Contents of the Avahi services directory.
You can open the files to check their contents. Here is an explanation on how they are configured. But be careful to not change anything because those are the configuration files for the default services of the LinkIt Smart.
We will create our new service from one of these files, to make things easier. Just drag the http.service file to the left side of the WinSCP GUI, so it gets copied to your computer’s working directory, as shown in figure 6.

Figure 6 – Transferring the example .service file from the LinkIt Smart.
Change its name to myservice.service, by right clicking the file on your computer’s directory and choosing Rename.
Double click on the file to open the editor. In the name tag, replace the content inside the tags with myservice. In the type tag, change it to _serv._tcp. In the port tag, change the content to 100. The final result should be the same as in figure 7. Click save and close the editor.
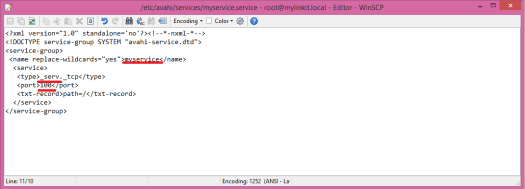
Figure 7 – Editing the new service configuration file.
Now, drag the new myservice.service file to the LinkIt Smart directory. It should now be available there, as shown in figure 8.
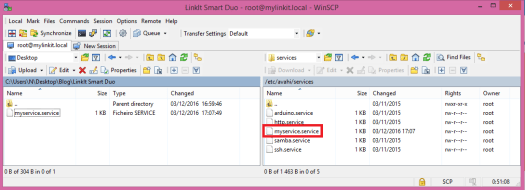
Figure 8 – Transferring the .service file to the LinkIt Smart.
We are now finished with the WinSCP part. Just open Putty and navigate to the services directory to confirm the file is there. On the default directory, after connecting, just type:
cd /etc/avahi/services
ls
You should see the file alongside the other services, as shown in figure 9.

Figure 9 – Newly configured .service file.
Now, we just need to tell the daemon to reload the configuration files, to include our new service:
avahi-daemon -r
This will give no output, but the daemon should reload the files from the services directory.
Now, the easiest way to check if the services are being advertised is to run an application such as the MDNS browser for the Google Chrome web browser. You can execute it from here.
Figure 10 shows the new service we have just configured in the MDNS browser.

Figure 10 – New LinkIt Smart service advertised on the MDNS browser.
Final notes
This tutorial explained how to configure additional services to be advertised via mDNS for our LinkIt Smart.
Since the mDNS resolution needs no central infrastructure, this solution is very good for our devices to advertise their services in an IoT network.
Related content
- Zero configuration networking in OpenWRT
- Avahi .service file configuration
- Avahi daemon file configuration
- MDNS browser for Google Chrome
Related posts
- LinkIt Smart Duo: Transferring files with SCP
- ESP8266 Webserver: Resolving an address with mDNS
- Linkit Smart Duo: Getting started
References
[1] http://searchsoa.techtarget.com/definition/daemon
[2] http://www.webopedia.com/TERM/D/daemon.html
[3] https://linux.die.net/man/8/avahi-daemon
[4] http://superuser.com/questions/316715/removing-the-avahi-daemon-on-ubuntu

One Reply to “”