In this tutorial we will learn how to handle the body of a HTTP POST request, sent to a HTTP web server running on the ESP32. The tests were performed using a DFRobot’s ESP32 module integrated in a ESP32 development board.
Introduction
In this tutorial we will learn how to handle the body of a HTTP POST request, sent to a HTTP web server running on the ESP32.
We will be using the Arduino core and the async HTTP web server libraries. Please consult the “Related posts” section at the end for more posts on the HTTP web server libraries.
Important: If you experience compilation problems similar to the ones mentioned in this GitHub issue, please make sure to update the AsyncTCP library to this version, accordingly to what is suggested here.
The AsyncTCP library is a dependency of the HTTP async web server libraries, which needs to be installed before using the framework, as indicated in this getting started post.
In order to update to the version of the AsyncTCP library that fixes the issue, simply go to the link and click the “Clone or Download” button. Choose the “Download ZIP option” and extract the downloaded folded. Rename it from “AsyncTCP-idf-update” to simply “AsyncTCP”.
Then, locate Arduino folders where you should have originally installed the AsyncTCP library and paste there the previously downloaded and renamed folder. When asked to replace the folder, choose accept. For security, you may make a copy of the previous version before replacing it, in case you need to rollback.
The tests were performed using a DFRobot’s ESP32 module integrated in a ESP32 development board.
If you prefer a video version of this tutorial, please check my YouTube channel below.
The code
We will start by including the WiFi.h and the ESPAsyncWebServer.h libraries, in order to be able to both connect the ESP32 to a WiFi network and then to setup the HTTP web server to listen to incoming requests.
To be able to connect to the network, we will need to have its credentials, namely the name of the network (SSID) and the password.
To finish the global variable declarations, we will also need an object of class AsyncWebServer, which exposes the methods that we will use to setup the server routes and make it listen to the incoming requests.
#include "WiFi.h"
#include "ESPAsyncWebServer.h"

const char* ssid = "yourNetworkName";
const char* password =  "yourNetworkPassword";

AsyncWebServer server(80);
Moving on to the Arduino setup function, we will open a serial connection and then we will connect the ESP32 to the WiFi network, printing the IP that is assigned to it when the connection procedure finishes.
Serial.begin(115200);

WiFi.begin(ssid, password);

while (WiFi.status() != WL_CONNECTED) {
  delay(1000);
  Serial.println("Connecting to WiFi..");
}

Serial.println(WiFi.localIP());
Now we will take care of setting up a server route, which will receive the HTTP POST requests. To configure the route, we will use the on method of our AsyncWebServer object, like we did in many of the previous tutorials covering the HTTP web server framework for the ESP32.
As usual, we pass as first input a string with the name of the route, which we will call “/post“. As second input, we need to specify the HTTP methods that can be used on the route. Since we are only going to handle POST requests in this test, we will use the HTTP_POST enumerated value as second input of the on method.
Now, as third method, we need to pass a route handling function. Note that, in previous tutorials, it was in this function that we would implement all the logic associated with the reception of the request on that route.
Nonetheless, for this tutorial, our logic will depend on the body of the HTTP POST request, which we will not access in this function, but rather in a dedicated body handling function. Thus, we will still pass a C++ lambda function as we did before in previous tutorials (respecting the signature defined by the ArRequestHandlerFunction type), but we leave the body of this function empty.
Important: At the time of writing, we need to pass an empty handling function instead of NULL. If we pass NULL, the body handling function, which we will define later, will never execute.
As we can see in this header file, the on method is overloaded and it has a signature version that can receive two extra parameters. The fourth one is an upload handling function, that we will not need.
In this case, for this fourth argument, we can pass the value NULL rather than an function with an empty body. This will not cause any problems to te execution of the body handling function.
Finally, as fifth argument, we need to specify a body received handling function, which needs to respect the signature defined by the ArBodyHandlerFunction type (defined in this header file).
In order to respect the mentioned signature, our handling function should return void.
As first parameter, it receives a pointer to an object of class AsyncWebServerRequest. This is the same object that we have used in route handling functions in past tutorials to return back an answer to the client, and we can also use it in the body handling function for that same purpose.
As second argument, the function receives a pointer to an array of bytes, which correspond to the body of the request. As third argument, it receives the length of the mentioned array.
Important: The handling function also receives a fourth parameter named index in the function signature definition, and as fifth a parameter named total.
Although at the time of writing it is not clear in the documentation what is the purpose of these parameters, the example provided to the implementation of a body request handling function seems to indicate that the body may be received in chunks and these parameters are used to know the position of the chunk and the total number of bytes to be received for the whole request body.
Nonetheless, during my tests with, I haven’t yet used any body payload that was received in chunks and there’s most likely a minimum length that will split the body in chunks. In this GitHub issue, a user mentions that he has done tests with payloads up to 1.5KB and did not yet received a chunked response.
It’s important to clarify that the HTTP web server framework will take care of passing the parameters to our handling function whenever a HTTP POST request with a body is performed to our route. So, we only need to bind the handling function to the route once in our Arduino setup and we no longer need to call any function periodically. After the server starts, the framework will take care of everything under the hood and call our handling function when the body is received.
Note that, to keep the code more compact, we will declare the body handling function using the C++ lambda syntax.
server.on(
    "/post",
    HTTP_POST,
    [](AsyncWebServerRequest * request){},
    NULL,
    [](AsyncWebServerRequest * request, uint8_t *data, size_t len, size_t index, size_t total) {

      //Handling function implementation
  });
Our handling function implementation will be very simple. First, we will print all the received bytes of the body to the serial port in a loop. Since we know the length of the array of data we have received, we have a stopping condition for our loop.
for (size_t i = 0; i < len; i++) {
    Serial.write(data[i]);
}
Next, we will return back to the client a response to his request. For our simple example, we will just return an OK HTTP code (200). We do this by calling the send method on the AsyncWebServerRequest object pointer, passing as input the number of the HTTP response code.
request->send(200);
After concluding the declaration of our route, we need to call the begin method on our server object, so it starts listening to incoming HTTP requests.
server.begin();
The final source code can be seen below.
#include "WiFi.h"
#include "ESPAsyncWebServer.h"

const char* ssid = "yourNetworkName";
const char* password =  "yourNetworkPassword";

AsyncWebServer server(80);

void setup() {
  Serial.begin(115200);

  WiFi.begin(ssid, password);

  while (WiFi.status() != WL_CONNECTED) {
    delay(1000);
    Serial.println("Connecting to WiFi..");
  }

  Serial.println(WiFi.localIP());

  server.on(
    "/post",
    HTTP_POST,
    [](AsyncWebServerRequest * request){},
    NULL,
    [](AsyncWebServerRequest * request, uint8_t *data, size_t len, size_t index, size_t total) {

      for (size_t i = 0; i < len; i++) {
        Serial.write(data[i]);
      }

      Serial.println();

      request->send(200);
  });

  server.begin();
}

void loop() {}
Testing the code
To test the code, first compile and upload it to your ESP32 using the Arduino IDE. Once the procedure finishes, open the serial monitor and copy the IP address that will get printed when the device connects to the WiFi network.
In order to make the POST request to the server, my recommendation is to use Postman, a very easy to use and free tool that allows to send HTTP requests.
After installing Postman, open it and, on the URL bar, type the following, changing #yourIp# by the IP address you have copied from the Arduino IDE serial monitor:
http://#yourIp#/post
Then, on the methods dropdown on the left of the URL bar, choose “POST“. Then, click on the “body” tab below the URL bar and, on the radio buttons below, choose “raw“.
A text editor will open. There you can specify your body content. I’m going to write a simple “Hello World” message, but you can put the content you want. Finally, click the “Send” button.
Figure 1 illustrates in more detail the user interface of Postman and the mentioned parts that need to be configured. Note that after sending the request, the ESP32 should return a 200 HTTP code (OK) as response, as also illustrated in figure 1, in green.
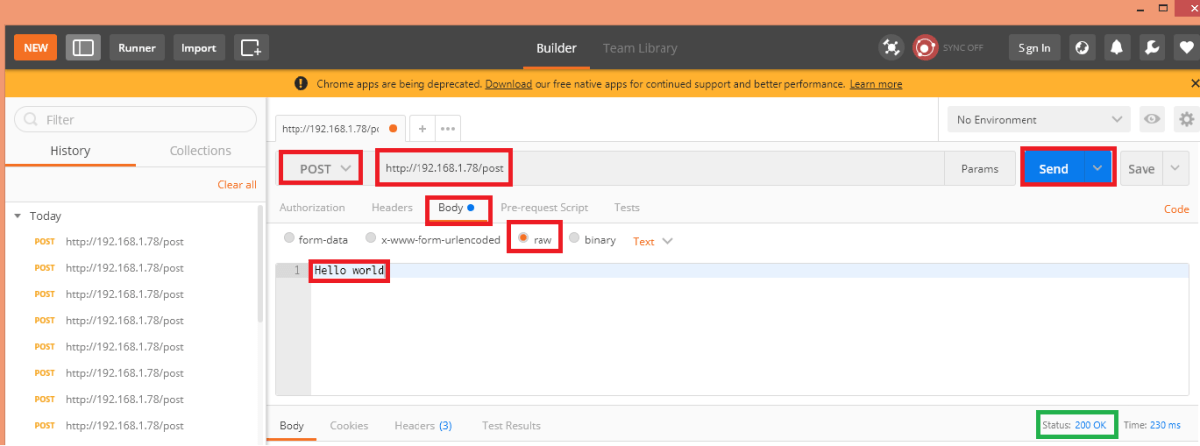
Figure 1 – Postman with the request sent to the ESP32 and the response returned.
If you go back to the Arduino IDE serial monitor, you should see the body content sent by Postman, as illustrated in figure 2.

Figure 2 – Output of the request body printed to the serial monitor.
Related posts
- ESP32 web server: template processing when serving HTML from file system
- ESP32 HTTP web server: Serving external JavaScript file
- ESP32 Arduino web server: Serving external CSS file
- ESP32 Arduino web server: Receiving data from JavaScript websocket client
- ESP32 HTTP web server: serving image from file system
- ESP32 Async HTTP web server: websockets introduction
- ESP32 Arduino HTTP server: external and internal redirects
- ESP32 Arduino: Asynchronous HTTP web server
Fantastic Tutorials. Using esp32, Im getting “no response” to my post using postman 6.4.4 with windows, I’ve updated to the latest ESP32 core and the AsyncTCP (was a compile error after updating the esp32core). I can do a server.on ( “/hello” HTTP_GET …) which returns a string to postman so the server is running but nothing from the “/post” , I am sending as a POST command. Goal is to send data from a SIM800L module to the esp32 server.
Hi!
Thank you very much for the feedback, I’m very happy to know you are finding the tutorials useful 🙂
In your tests, is just Postman not receiving the response? Is the body handling function of the ESP32 triggering?
Since you have tested the GET and it is working, it may be something on your post body handling function that is not reaching the part where it returns the answer to the client.
If you replace the implementation of your body handling function by simply
request->send(200);
Does it start returning an answer to postman?
Also, did you keep the empty route handling function (second argument of the on method) rather than null? if we set that to null instead of an empty function, the body handling function will never execute and I think it returned 500 to the client.
Also, when you start doing tests with the SIM800L, please don’t forget that the ESP32 will not be reachable from outside the network to which it is connected to, unless you do port forwading, or use other method to make the packets that come from outside the network to be sent to the ESP32.
Hope these suggestions help 🙂
Best regards,
Nuno Santos
Thanks Nuno, turned out to be my settings in postman, all working now and I’ll keep going. Yes I have port forwarded . Made the ALEXA VOICE CONTROL TV REMOTE ESP8266 just over a year ago.
You’re welcome, I’m glad you have been able to solve the issue 🙂
Very nice project! I’ve never tried to connect the ESP to the Alexa, although I see a lot of potential 🙂
Best regards,
Nuno Santos
looks like it splits large data blocks into blocks ~ 1100 to ~ 1450
Thank you very much for sharing! This information will be very useful for other readers 🙂
I’ve not tried yet with payloads of that size, which is why I haven’t yet seen the payload being split.
I’m not sure if this is documented on the HTTP web server libs, but it definitely should 🙂
Best regards,
Nuno Santos
Hi, I’m getting the following error when compiling
“exit status 1
Error compiling for board ESP32 Dev Module.”
Do you know why that is?
Thanks
Hi!
Are you using the exact same code from the tutorial?
I’m not sure what may be causing the issue since it compiles file for me.
My recommendation is to pull the latest changes from the Arduino core and from the HTTP async libraries.
Let me know if it helps 🙂
Best regards,
Nuno Santos
This does not work for HTTP forms. How do I have to change the code to display the keys and values of my forms?
Hello, thanks a lot for this amazing tutorial.
I just have a small question, what should I do if I want to have more than one requesting method? e.g: if I want to use the HTTP_GET and the HTTP_POST methods, what should I write in the second parameter in the server.on() function?
Thanks.
Hi,
Thanks for a great tutorial. I have a problem with accessing the data from an actual html form however. If the content type is x-www-form-urlencoded rathern than “raw” as suggested in the Postman test, the POST method body handler is not called. How does one access the body when a html form is using the POST method? Hope you can help.
Cheers
Steve
PS This person appears to know, but I don’t understand his solution.
https://github.com/me-no-dev/ESPAsyncWebServer/issues/171
i becomes a 500 error Unexpected response code 500 for http://192.168.178.70 with the same code