In this tutorial, we will check how to create a file in the ESP32 using the SPIFFS file system. The tests were performed using a DFRobot’s ESP32 module integrated in a ESP32 development board.
Introduction
In this tutorial, we will check how to create a file in the ESP32 using the SPIFFS file system.
SPIFFS stands for SPI Flash File System and it is a file system intended for SPI NOR flash devices on embedded devices [1]. You can read more about SPIFFS here.
In this tutorial, we will check how to mount the file system, create a file and write some text to it. We will cover how read from the file in the next tutorials.
This tutorial is based on the Arduino core SPIFFS example, which I encourage you to try.
The tests were performed using a DFRobot’s ESP32 module integrated in a ESP32 development board.
If you prefer a video tutorial, please check my YouTube channel below.
The code
We start our code by including the SPIFFS.h library, so we have access to all the functions we need to interact with the file system.
Note that this include will make available an extern variable called SPIFFS, which we will use below to call some of the methods we need. This extern variable is an object of class SPIFFSFS.
#include "SPIFFS.h"
Now we can move on to the Arduino setup, where we will start by opening a Serial connection. This way, we will be able to output the result of the operations, to know if they were successful or not.
Serial.begin(115200);
After that, we need to mount the file system, so we can start using it. We do it by calling the begin method on the SPIFFS extern variable.
This method receives as optional input a Boolean flag that indicates if the SPIFFS file system should be formatted in case the mount fails. Its value defaults to false, as can be seen by the header file.
Since if SPIFFS was never formatted it will fail mounting and we need to format it, then we will pass this flag as true. In my case, I already had my file system formatted, so this flag has no effect.
The begin method call will return true if the file system is successfully mounted or false otherwise. We will use the returning value of this method to perform an error check before continuing with the code.
if(!SPIFFS.begin(true)){
      Serial.println("An Error has occurred while mounting SPIFFS");
      return;
}
If mounting the file system succeeds, we can proceed with the creation of the file. To do it, we simply need to call the open method of the SPIFFS extern variable. Note that the SPIFFSFS class extends the FS class and this method is inherited from that class.
The mentioned method receives as first input the name of the file and as second the opening mode. We will create a file called “/test.txt” and since we want to open the file for writing, we use the FILE_WRITE constant, which is defined here.
Naturally, the file doesn’t need to exist beforehand for us to open it. In our case, we are creating a new file because it did not exist before.
This method call returns an object of class File, which we will use below to write to the file.
File file = SPIFFS.open("/test.txt", FILE_WRITE);
Note that the File class overloads the C++ Boolean operator, which means we can check if the file was successfully opened with an if condition.
if(!file){
     Serial.println("There was an error opening the file for writing");
     return;
}
In case it was successfully opened, we can simply write some content to the file using the print method on our File object. Note that the File class extends the Stream class, which extends the Print class. The print method we are going to use is inherited from the Print class.
Since this method returns the number of bytes written, we can do an error check with an IF condition.
if(file.print("TEST")) {
    Serial.println("File was written");
}else {
    Serial.println("File write failed");
}
Finally, we call the close method to close the file.
file.close();
The final source code can be seen below.
#include "SPIFFS.h"

void setup() {

  Serial.begin(115200);

  if (!SPIFFS.begin(true)) {
    Serial.println("An Error has occurred while mounting SPIFFS");
    return;
  }

  File file = SPIFFS.open("/test.txt", FILE_WRITE);

  if (!file) {
    Serial.println("There was an error opening the file for writing");
    return;
  }
  if (file.print("TEST")) {
    Serial.println("File was written");
  } else {
    Serial.println("File write failed");
  }

  file.close();
}

void loop() {}
Testing the code
To test the code, simply compile it and upload it to your device using the Arduino IDE, with an installation of the Arduino core for the ESP32.
Once the procedure finishes, open the Arduino IDE Serial Monitor. You should get an output similar to figure 1, which indicates the content was correctly written to the file.
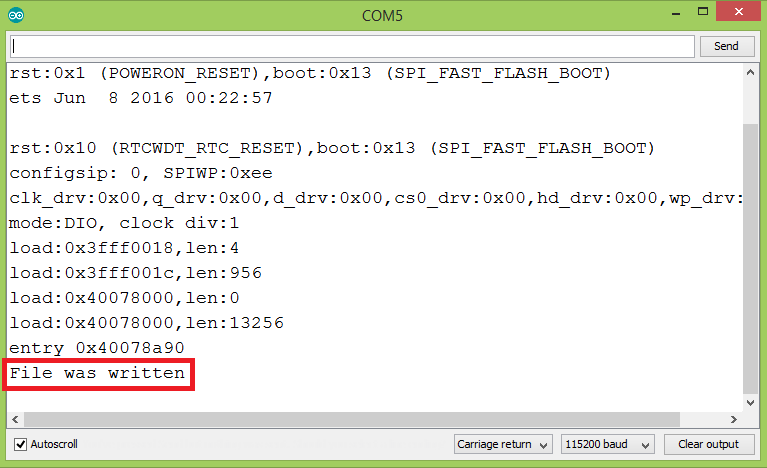
Figure 1 – Writing a file in the ESP32 SPIFFS file system.
References
[1] https://github.com/pellepl/spiffs
Hi
i am facing an issue with saving/writing a pulse count from an external source
when power fails and reading it when power comes back. there are a lot of tutorials about saving LED state and push buttons, but nothing that helps with a power outage and auto save, when the power shutdown event happens.
Can you please help me with this or make a tutorial so i can follow it.
Hi, PRAJITH, I am just learning as you about this, but I don’t think saving the state on a file to prevent an energy shut down would be a good idea. I think there is a better way. I read, days ago, that Arduino let you allocate variables in the non volatile memory. I was wondering about when to use that, but know you gave me the answer.