The objective of this post is to explain how to create a Websocket server on the ESP32, using the Arduino core as programming framework. The tests of this ESP32 tutorial were performed using a DFRobot’s ESP-WROOM-32 device integrated in a ESP32 FireBeetle board.
Introduction
The objective of this post is to explain how to create a Websocket server on the ESP32, using the Arduino core as programming framework. Our Websocket server will act as an echo server, which will return to the client any data that it sends.
Since we will need to test our server, we will develop a very simple client on Python. Even for those who have not used Python yet, it is a very simple (yet powerful) language, so it should be easy to follow the code shown below.
Nonetheless, if you still don’t feel comfortable with using Python, you can test the code with the ESP32 Websocket client from the previous post running on another ESP32 or use a Websocket API from other programming language you feel comfortable with.
The tests of this ESP32 tutorial were performed using a DFRobot’s ESP-WROOM-32 device integrated in a ESP32 FireBeetle board.
The Arduino library
On the ESP32 side, we will need to install a Websockets library, so we don’t need to code the low level details ourselves. We will use this library, which works on top of the WiFiServer that is usually used in the Arduino core for creating a TCP server.
Please note that the Websockets library mentioned is not, at the time of writing, officially supported on the ESP32, but rather on the ESP8266. Nonetheless, with a few changes, we will be able to use it on the ESP32.
The installation details for the library are explained in this previous tutorial. Please consult it first since there are a few tricks that need to be taken in consideration before using it.
The Arduino code shown below is based on this example from the library, changed to work with the ESP32.
The Python module
We will also need to install a Websockets module on Python, again to abstract the low level implementation details of Websockets.
We will use a Python module called websocket-client. Fortunately, Python installations come with a package installer called pip, which makes installing modules very simple.
Thus, to install the mentioned library, we simply need to send the following command on a Windows command line:
pip install websocket-client
Note that depending on the way your Python version was installed, you may need to navigate to the folder where pip is located before sending the previous command.
The Python code
We will start by importing the websocket client module we have just installed. We will also need to import the time module for introducing some delays in our program.
import websocket
import time
After this, we will need to instantiate an object of class WebSocket, from the previously imported module.
ws = websocket.WebSocket()
Then, we simply call the connect method on our WebSocket object, passing as input the address of the server.
Note that since this is a websocket connection, we specify the destination with “ws://{serverIP}/“, where the server IP will be the one assigned to our ESP32 when it connects to a WiFi network.
Note that I’m using the IP of my ESP32, which I already know what is when connected to my home network. Nonetheless, in case you don’t know yours yet, we will print its value on the Arduino code.
ws.connect("ws://192.168.1.78/")
After this call, we should be connected to the server. Note that I’m not doing any error handling for simplicity, but it is important to do it in a final application.
Next, to send data to the server, we simply need to call the send method of our WebSocket object, passing as input a string with the content.
ws.send("data to send")
To receive data from the server, we simply call the recv method on the WebSocket object. This method returns the data from the server, if any is available, and thus we should assign its value to a variable.
result = ws.recv()
Finally, to disconnect from the server, we need to call the close method on our WebSocket object.
result = ws.close()
You can check the full source code for the Python Websocket client below. Note that we are now sending and receiving the requests on a loop and printing the data obtained from the server to confirm that it is indeed echoing the content.
You can change the nrOfMessages variable and the sleep time to test the resilience of the server to more requests and shorter intervals between requests.
import websocket
import time

ws = websocket.WebSocket()
ws.connect("ws://192.168.1.78/")

i = 0
nrOfMessages = 200

while i<nrOfMessages:
    ws.send("message nr: " + str(i))
    result = ws.recv()
    print(result)
    i=i+1
    time.sleep(1)

ws.close()
The arduino Code
Includes and global variables
We will start our Arduino code by including some libraries. We will need the WiFi.h library, which allows us to connect the ESP32 to a WiFi network, and the WebSocketServer.h library, which will expose the functionality needed for us to set up a websocket server.
#include <WiFi.h>
#include <WebSocketServer.h>
Next, we will need an object of class WiFiServer, so we can create a TCP server and make it listen for incoming requests. The websocket server will be built on top of it.
One of the optional parameters of the constructor of this class is the port where the server will be listening. Although its default value is 80, we will explicitly pass this input for illustration purposes.
WiFiServer server(80);
We will also need an object of class WebSocketServer, which exposes the methods needed to receive requests from clients and handle the data exchange.
WebSocketServer webSocketServer;
To finalize the global variables declaration, we will need to store both the WiFi network name (ssid) and its password, for later connecting to it.
const char* ssid = "yourNetworkName";
const char* password = "yourNetworkPassword;
The setup function
Moving on to the setup function, we will start by opening a serial connection to output the results of our program.
Then, we will connect the ESP32 to a WiFi network and print the local IP that is assigned to it. That is the IP that you should use on the previously explained Python code.
Please consult this previous post for a detailed explanation on how to connect to a WiFi network on the ESP32.
Serial.begin(115200);

WiFi.begin(ssid, password);

while (WiFi.status() != WL_CONNECTED) {
    delay(1000);
    Serial.println("Connecting to WiFi..");
}

Serial.println("Connected to the WiFi network");
Serial.println(WiFi.localIP());
To finalize the setup function, we will initialize our TCP server by calling the begin method on the WiFiServer object. This method receives no arguments and returns void.
server.begin();
You can check the full setup function code below.
void setup() {

  Serial.begin(115200);

  WiFi.begin(ssid, password);

  while (WiFi.status() != WL_CONNECTED) {
    delay(1000);
    Serial.println("Connecting to WiFi..");
  }

  Serial.println("Connected to the WiFi network");
  Serial.println(WiFi.localIP());

  server.begin();
  delay(100);
}
The main loop
We will handle the client connections and the exchange of data on the Arduino main loop function.
First we will listen for incoming connections by calling the available method on our WiFiServer object. This method call will return an object of class WiFiClient.
Note that in this step, we are still working at the TCP client level and not at the websocket client level.
WiFiClient client = server.available();
Next we check if the TCP client is connected simply by calling the connected method of the previously returned WiFiClient object, which will return true if the client is connected and false otherwise.
We will also call the handshake method of our WebSocketServer object (a global variable we declared at the beginning of the code), passing as input our WiFiClient object, which will be used under the hood to establish the protocol handshake.
This method call will return a Boolean value indicating if the handshake process was successfully performed, and thus we should also check for this value before proceeding with the actual communication with the client.
if (client.connected() && webSocketServer.handshake(client)) {
   // Communication with the client
}
Since we are going to develop a simple websocket echo server, we will need a data buffer to first receive the data from the client. As we will see next, the methods to use work with strings, which will be the data type of our buffer.
String data;
Since the client may disconnect at any time, we will now do a while loop which will keep executing while the client is connected.
Between each iteration of the loop, we need to add a small delay. This is of extreme importance because otherwise we will stop receiving data from the client after the first few bytes.
The code so far for our conditional block can be seen below.
if (client.connected() && webSocketServer.handshake(client)) {

    String data;

    while (client.connected()) {

       // Handle communication
       delay(10); // Delay needed for receiving the data correctly
}
}
Now, inside our loop, we will receive the data by calling the getData method on the webSocketServer object. This method receive no arguments and returns a String as output, which we will assign to our previously declared data buffer.
data = webSocketServer.getData();
After receiving the data, we will print it to the serial port and then echo it back to the client.
We send data to the client with a call to the sendData method of the WebSocketServer object. This method receives as input a String with the data to send to the client and returns void.
Since the client may have sent no data, we perform the previous calls inside a conditional block where we check for the length of our data buffer. So, the length should be greater than 0 for us to send the data back to the client.
if (data.length() > 0) {
   Serial.println(data);
   webSocketServer.sendData(data);
}
You can check the complete Arduino loop function below. Note that we added an extra print for when the client disconnects from the server. This happens when the loop where we check if the client is connected ends.
void loop() {

  WiFiClient client = server.available();

  if (client.connected() && webSocketServer.handshake(client)) {

    String data;

    while (client.connected()) {

      data = webSocketServer.getData();

      if (data.length() > 0) {
         Serial.println(data);
         webSocketServer.sendData(data);
      }

      delay(10); // Delay needed for receiving the data correctly
   }

   Serial.println("The client disconnected");
   delay(100);
  }

  delay(100);
}
The final Arduino code
The final code Arduino can be seen below. You can simply copy and paste it to your Arduino environment. Don’t forget to put your WiFi network credentials on the global variables.
#include <WiFi.h>
#include <WebSocketServer.h>

WiFiServer server(80);
WebSocketServer webSocketServer;

const char* ssid = "yourNetworkName";
const char* password =  "yourNetworkPassword;
void setup() {

  Serial.begin(115200);

  WiFi.begin(ssid, password);

  while (WiFi.status() != WL_CONNECTED) {
    delay(1000);
    Serial.println("Connecting to WiFi..");
  }

  Serial.println("Connected to the WiFi network");
  Serial.println(WiFi.localIP());

  server.begin();
  delay(100);
}

void loop() {

  WiFiClient client = server.available();

  if (client.connected() && webSocketServer.handshake(client)) {

    String data;

    while (client.connected()) {

      data = webSocketServer.getData();

      if (data.length() > 0) {
         Serial.println(data);
         webSocketServer.sendData(data);
      }

      delay(10); // Delay needed for receiving the data correctly
   }

   Serial.println("The client disconnected");
   delay(100);
  }

  delay(100);
}
Testing the code
To test the code, first compile it and upload it to your ESP32 board using the Arduino IDE. Then, open the serial monitor with the baud rate defined on the Serial.Begin function.
Upon connecting to the WiFi network, the local IP of the ESP32 will be printed to the console. That is the IP you should use on the connect method, on the Python program.
Then, after putting the correct IP in the Python program and with the ESP32 connected, simply run the Python program. You should get the messages sent to the ESP32 echoed back and printed to the Python console, as shown in figure 1.
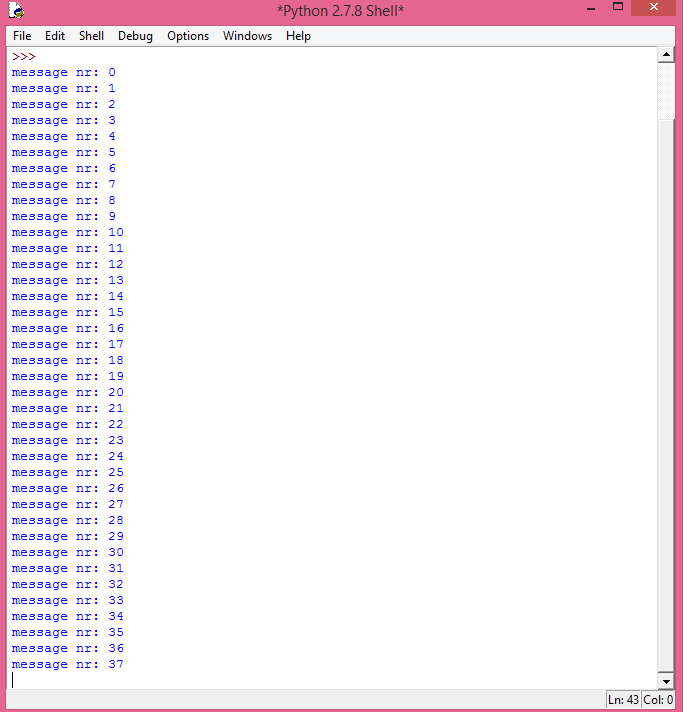
Figure 1 – Messages sent from the Python client echoed back.
If you go back to the Arduino IDE serial monitor, you should see the same messages getting printed, as shown in figure 2.

Figure 2 – Messages received by the ESP32.
Upon finishing sending all the messages, the Python client should disconnect. That should be detected on our Arduino loop that is checking for the connection and thus a message indicating that the client disconnected gets printed, as shown in figure 3.

Figure 3 – Client disconnected.
Related content
Hi Nuno,
I really appreciate your tutorials and I share them with my students.
I am using an ESP8266 as a web server (to serve html and javascript content) and I would like to add websocket functionality. Is it possible to serve a web page using the ESP8266WebServer library (like you have shown in other tutorials) and upgrade the connection using the WebSocketServer library? It seems the WiFiServer class does not contain the .handleClient() method and the ESP8266WebServer library does not contain the .available() method. Any thoughts on this? I am hoping to use the browser as the client.
Thanks
Hi Tyler,
Thank you very much for your feedback, I’m very happy to know that you are finding the tutorials useful and thanks for sharing them with your students 🙂
I’ve not been working with the ESP8266WebServer for a while but the last time I used it there was no way of upgrading the connection to web socket.
If you need all of those functionalities, my recommendation is to take a look at the new asynchronous HTTP web server libraries, which are supported both in the ESP32 and the ESP8266:
https://github.com/me-no-dev/ESPAsyncWebServer
They allow serving content like the older libraries did, with the advantage of being asynchronous (we don’t need to periodically call some method in the Arduino main loop).
One of the supported features is websockets, as can be seen in the library example code:
https://github.com/me-no-dev/ESPAsyncWebServer/blob/master/examples/ESP_AsyncFSBrowser/ESP_AsyncFSBrowser.ino
Unfortunately I haven’t yet had the chance to use the websockets part, so I cannot confirm if it works fine, but all the other features I’ve been testing work very reliably, so I believe websockets should also work fine.
Here is a getting started guide for using the async HTTP server libraries with the ESP8266:
https://techtutorialsx.com/2018/01/01/esp8266-arduino-asynchronous-http-web-server/
I’ve done most of the tutorials of this library using the ESP32, but most of them should work on the ESP8266 with relatively few changes, since the library was designed to work with both devices.
Hope this helps and let us know if web sockets work well in that library in case you have the chance to test them 🙂
Best regards,
Nuno Santos
Nuno,
I have really been enjoying your tutorials and I love how you explain each section of the code. I’ve been able to follow your webserver examples to have my ESP32 host a static HTML page showing temperature from a pair of thermistors and with tri-state buttons (OFF/LOW/HIGH) to control a fan and pump. It works well but I have to refresh the page to update the values and the system response lags about a second after the button press. I’ve been trying to edit the code to use JS/AJAX to refresh the thermistor values but it seems like websockets is probably the way to go.
I’m just having a hard time bridging the gap between the websocket client/server examples and the http server examples. There are a few good ESP8266 examples such as (http://adityatannu.com/blog/post/2016/01/24/ESP8266-Websockets-demo-using-NeoPixels.html) but nothing that I’ve found for ESP32.
Could you consider doing a future ESP32 tutorial where the ESP hosts a webpage that exchanges two-way data via websockets? Lots of bonus points if it also displays the data via Smoothie charts (http://smoothiecharts.org/tutorial.html) which is a simple offline live charting script.
Thank you,
Matt
Hi Matt,
Thank you very much for the feedback, I’m very happy to know that the tutorials are being helpful 🙂
That’s an interesting project the one you are describing, and it touches many challenges of web development.
As you have correctly mentioned, if you want to have a “real time” update of your backend measurements, then using websockets is the best approach.
As for the end to end system, unfortunately I don’t have any code that covers everything.
Your suggestion of a tutorial is interesting and will definitely consider it since I think more people could benefit from it 🙂
I’m having some busy weeks at my daily job so it might take me some time to do it, but I’ve added it to my list 🙂
Meanwhile, I can share some examples of websockets ESP32 code so it may help you doing some progress.
Here is a tutorial on using websockets on the ESP32, which will act as a ws server:
https://techtutorialsx.com/2017/11/03/esp32-arduino-websocket-server/
In this case the client is a Python program.
Here is a similar example but with the ESP32 working as a socket client:
https://techtutorialsx.com/2017/11/01/esp32-arduino-websocket-client/
Note however that the library used just implements the websockets functionality and it was originally intended for the ESP8266 (although it works on the ESP32). As far as I’m aware, it is no longer being actively supported, due to the fact that the latest commit was in April 2016.
In your case, I think the best approach is to use the Async HTTP webserver libraries for the ESP32, which not only allow us to serve the HTML / JavaScript pages, but also to setup the websockets endpoint:
https://github.com/me-no-dev/ESPAsyncWebServer#async-websocket-plugin
Hope this helps and when I find the time, I will try to post an example as you suggested 🙂
Best regards,
Nuno Santos
Pingback: ESP32 Async HTTP web server: websockets introduction | techtutorialsx
Pingback: ESP32 Async HTTP web server: websockets introduction | techtutorialsx
hi frined.thank you for tutorials.are there possibility to get clients uniqe id and
then send message to specific client?