The objective of this post is to explain how to get started using Espruino, a JavaScript interpreter for microcontrollers, on the ESP32. This tutorial was created on Windows (version 8.1) and was tested on a DFRobot’s ESP-WROOM-32 device integrated in a ESP32 FireBeetle board.
Introduction
The objective of this post is to explain how to get started using Espruino on the ESP32.
Espruino is a JavaScript interpreter for microcontrollers [1], which means that we will be able to program the ESP32 with this language. If you want to program the ESP32 with Python, please check this previous post.
You can check the GitHub page of the project here and the official website here.
This tutorial was created on Windows (version 8.1) and was tested on a DFRobot’s ESP-WROOM-32 device integrated in a ESP32 FireBeetle board.
Downloading the files
In order to be able to use Espruino, we will need to flash our ESP32 with the adequate firmware. The binary files with the firmware can be obtained from here. To download, just click on the link on the top of the page, as indicated in figure 1.

Figure 1 – Downloading the binary files of Espruino for the ESP32.
A .zip file will be downloaded, with multiple files inside. Inside that .zip file, we should extract the folder that refers to the ESP32. At the time of writing, it was labeled espruino_1v94_esp32, as indicated in figure 2. Note however that this name may change, most likely the version.

Figure 2 – .Zip with the binary files to upload.
Flashing the firmware
After extracting the folder with the binary files, we need to flash them to our board. The easiest way to do it is by using the esptool, from Espressif. This is a Python tool that allow us to flash firmware into the ESP32.
As indicated in the GitHub repository of esptool, we need to have Python 2.7, Python 3.4 or a higher version installed on our computer. After that, we simply need to use Pip, a Python’s package repository, to install the esptool. To do so, simply send the following command on the Windows command line:
pip install esptool
Please note that in some Python installations, you may need to navigate into the Scripts directory of the Python installation for the command to be recognized.
Next, to perform the actual flashing of the firmware, the easiest way is opening a command line and then navigate to the folder we extracted from the .zip file.
There, we need to give the command below, taking in consideration the following:
- You need to change COM11 by the COM port of your board on your computer;
- The actual flash configurations may be different. These ones work for the FireBeetle board;
- At the time of writing, the flash addresses for the binary files were the ones indicated on the command. They we’re taken from the README file inside the folder with the binary files, and they may change future versions. Please confirm the addresses on your README file before sending the command;
- If you don’t run the command from inside the folder where the binary files are, then you need to specify their path before each file name.
esptool.py --port COM11 --baud 460800 write_flash --flash_size=detect 0x1000 bootloader.bin 0x10000 espruino_esp32.bin 0x8000 partitions_espruino.bin
You can check below at figure 3 the result in the command line.

Figure 3 – Flashing the Espruino firmware.
Installing the IDE
The easiest way to interact with the board after the flashing procedure is by using the Espruino IDE. Although there is a web based version, at the time of writing there are some issues mentioned here regarding the ESP32 support.
Thus, we can download the Windows native version of the IDE here. After the installation, open the IDE. You can check below at figure 4 the look and feel of the IDE.

Figure 4 – Espruino IDE.
In order to be able to interact with the board, we need to go to the Settings menu, which is opened by clicking on the top rightmost icon. There, go to the communications tab and on the Baud Rate entry change the dropdown value to 115200, as shown in figure 5.

Figure 5 – Changing the Baud Rate of the Espruino IDE.
Finally, to connect to the board, click on the top left icon, as indicated in figure 6.

Figure 6 – Connecting to the board.
Upon clicking the icon, a list with the available COM ports will pop, as indicated in figure 7. Choose the correct COM port for your board.

Figure 7 – Selecting the correct COM port.
After that, you should get back to the previous view automatically, but the left side of the IDE should now be changed to a command line aspect, as indicated in figure 8. Note that you should be able to write things on the command line.
After the flashing procedure, you may need to connect a first time, and then disconnect and connect back again for everything to work correctly.
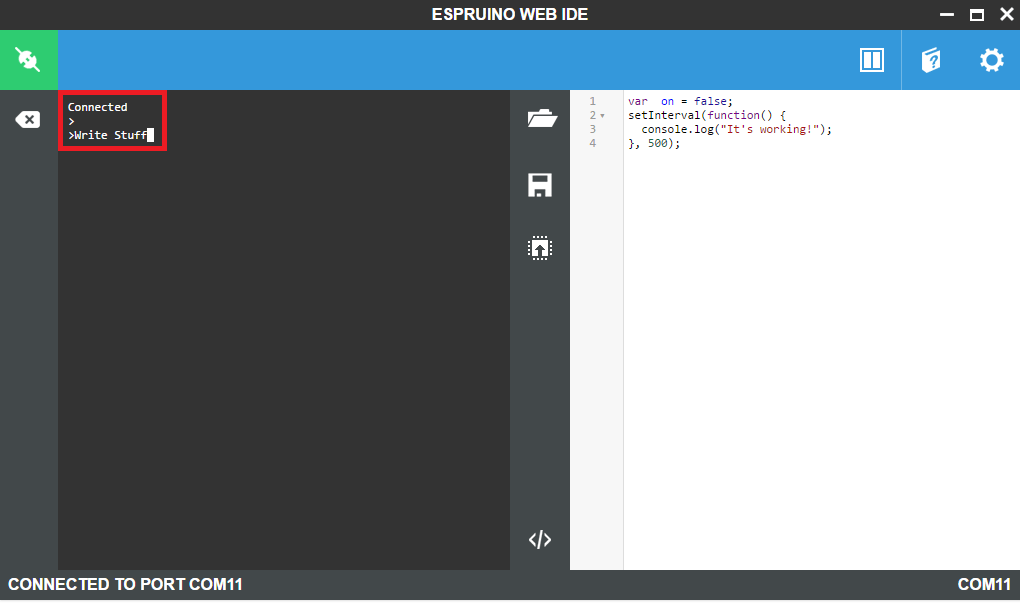
Figure 8 – Espruino IDE after connecting to the ESP32.
Hello World
We will write a simple Hello World command on the command line. To do it, simply type the following command and hit enter:
console.log("Hello World");
You should get an output similar to figure 9, which shows the printed message.

Figure 9 – Hello World on the Espruino running on the ESP32.
Note that the undefined value returned after the printed “Hello World” indicates the result of the last operation, which is undefined for the console log command [2].
References
[1] https://github.com/espruino
[2] http://www.espruino.com/ESP32
Pingback: ESP32 Espruino: Scanning WiFi Networks | techtutorialsx
Pingback: ESP32 Espruino: Scanning WiFi Networks | techtutorialsx
Pingback: ESP32 Espruino: Connection to a WiFi network | techtutorialsx
Pingback: ESP32 Espruino: Connection to a WiFi network | techtutorialsx
Pingback: ESP32 Arduino HTTP Server: Serving HTML and JavaScript | techtutorialsx
Pingback: ESP32 Arduino HTTP Server: Serving HTML and JavaScript | techtutorialsx
Pingback: ESP32 Espruino: Listing property names of objects | techtutorialsx
Pingback: ESP32 Espruino: Listing property names of objects | techtutorialsx