The objective of this post is to explain how to launch tasks with the FreeRTOS functions.
Introduction
The objective of this post is to explain how to launch tasks with the FreeRTOS functions. Since this will introduce some complex concepts, we will start by a very simple example where we will create two tasks that will print some “Hello World” messages and then delete them.
For most of the functionalities that we are going to use in this tutorial, you can check the .h file here. Please check this previous post for an introduction on FreeRTOS and tasks.
The setup and loop code
We will start our setup function by opening a serial connection, in order to be able to get the output of our testing program. This will be our regular Arduino function.
Serial.begin(112500);
delay(1000);
Then, we will create the tasks, with a call to the xTaskCreate function. The arguments to this function are the following [1]:
TaskCode: In this argument, we need to pass a pointer to the function that will implement the task. We will create two functions, TaskOne and TaskTwo, which we will define latter and will be passed in this argument.
TaskName: The name of the task, in a string. We will use “TaskOne” and “TaskTwo”.
StackDepth: The size of the stack of the task, specified as the number bytes. There is no simple way of determining the size of the task [2], although some calculations can be made. In this simple example, we will pass a value that is big enough.
Update: In the original post, it was mentioned that the StackDepth was specified in words, like documented in the FreeRTOS xTaskCreate page. Nonetheless, IDF’s version differs from the original implementation and the stack depth is actually specified in bytes, as indicated in IDF’s documentation. We can also confirm this in IDF’s FreeRTOS task.h file.
Parameter: Pointer to a parameter that the task function can receive. It needs to be of type (void *) [2]. In this case, for simplicity of the code, we will not use it, so we pass NULL in the argument.
Priority: Priority of the task. We will create both tasks with the same priority.
TaskHandle: Returns an handle that can be used for latter reference of the task on calls to functions (for example, to delete a task or change its priority) [2]. Also, for this simple example, we are not going to use it, so it will be NULL.
This function returns pdPASS on success or an error code that can be seen here [1]. For now, we will assume that the tasks will be created without any problem, so we are not going to do any error checking. Naturally, for a real case scenario application, we would need to do that to confirm the tasks were created.
So, check bellow the full setup function, already with the calls create the two different tasks.
void setup() {

  Serial.begin(112500);
  delay(1000);

  xTaskCreate(
                    taskOne,          /* Task function. */
                    "TaskOne",        /* String with name of task. */
                    10000,            /* Stack size in bytes. */
                    NULL,             /* Parameter passed as input of the task */
                    1,                /* Priority of the task. */
                    NULL);            /* Task handle. */

  xTaskCreate(
                    taskTwo,          /* Task function. */
                    "TaskTwo",        /* String with name of task. */
                    10000,            /* Stack size in bytes. */
                    NULL,             /* Parameter passed as input of the task */
                    1,                /* Priority of the task. */
                    NULL);            /* Task handle. */

}
In the main loop, we won’t do anything because our tasks will implement all the functionality. So let’s just put a delay.
void loop() {
   delay(1000);
}
The task functions
Now, we only need to specify the functions for the tasks. Remember that we want to create a task implemented by function TaskOne and other implemented by function TaskTwo.
Note that task are implemented with regular functions and they only need to follow a predefined function prototype [3]. So, they must return void and they must receive as input an argument of type (void *) [3]. Check an example bellow.
void taskOne( void * parameter )
A very important thing to take in consideration is that this function should not return. So, they must not contain a return statement or execute until the end of the code [3]. Instead, they should be explicitly deleted [3].
To delete a task from inside its own code, we just need to call the vTaskDelete function. This function receives as input the handle of the task to be deleted [4] (remember the previously mentioned argument of the xTaskCreate that we are not going to use). Nevertheless, if we pass NULL as input the calling task will be deleted [4], which is what we want, since we are going to call it from the task’s own code.
vTaskDelete( NULL );
Other that these particularities, we are going to implement the two functions in a very simple way. Basically, we are going to do a simple loop where we are going to print a “Hello World” from each task and, after all the iterations of the loop, we will print a message stating the task will end.
Check the full code for this tutorial bellow, with both our tasks implemented.
void setup() {

  Serial.begin(112500);
  delay(1000);

  xTaskCreate(
                    taskOne,          /* Task function. */
                    "TaskOne",        /* String with name of task. */
                    10000,            /* Stack size in bytes. */
                    NULL,             /* Parameter passed as input of the task */
                    1,                /* Priority of the task. */
                    NULL);            /* Task handle. */

  xTaskCreate(
                    taskTwo,          /* Task function. */
                    "TaskTwo",        /* String with name of task. */
                    10000,            /* Stack size in bytes. */
                    NULL,             /* Parameter passed as input of the task */
                    1,                /* Priority of the task. */
                    NULL);            /* Task handle. */

}

void loop() {
  delay(1000);
}

void taskOne( void * parameter )
{

    for( int i = 0;i<10;i++ ){

        Serial.println("Hello from task 1");
        delay(1000);
    }

    Serial.println("Ending task 1");
    vTaskDelete( NULL );

}

void taskTwo( void * parameter)
{

    for( int i = 0;i<10;i++ ){

        Serial.println("Hello from task 2");
        delay(1000);
    }
    Serial.println("Ending task 2");
    vTaskDelete( NULL );

}
Running the code
To run the code, simply upload it to the ESP32 board using the Arduino IDE. You should get a result similar to figure 1, with both “Hello World” messages being printed to the serial console. In the end, also both the termination messages should be printed.
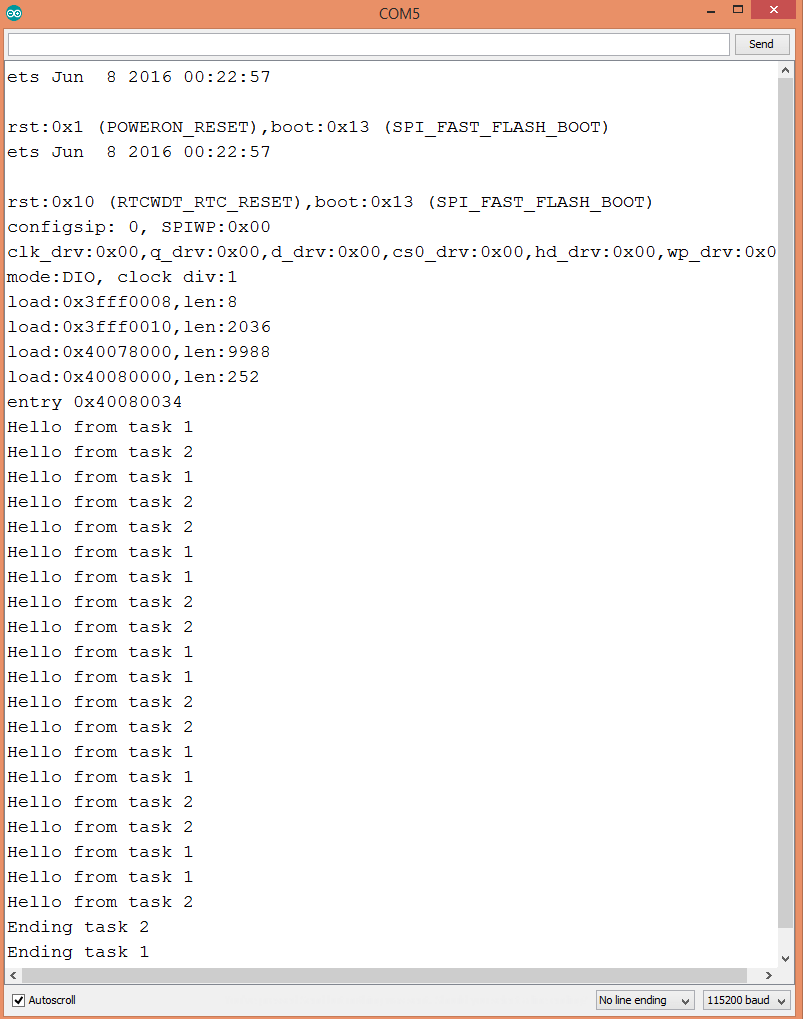
Figure 1 – Output of the program.
Note that both tasks were running in parallel, which is way the prints from each task are mixed. Naturally, the time of execution for each one of the tasks was decided by the RTOS scheduler.
Related Posts
References
[1] http://esp32.info/docs/esp_idf/html/dd/d3c/group__xTaskCreate.html
[2] http://www.freertos.org/Documentation/161204_Mastering_the_FreeRTOS_Real_Time _Kernel-A_Hands-On_Tutorial_Guide.pdf [Page 50]
[3] http://www.freertos.org/Documentation/161204_Mastering_the_FreeRTOS_Real_Time_Kernel-A_Hands-On_Tutorial_Guide.pdf [Page 46]
[4] http://www.freertos.org/a00126.html
Pingback: ESP32 Arduino: HTTP/2 GET Request – techtutorialsx
Pingback: ESP32 Arduino: HTTP/2 GET Request – techtutorialsx
That example code thread is not running in my ardunio board.