The objective of this post is to explain how to get the body of a request sent to a HTTP webserver runing on the ESP8266.
Introduction
The objective of this post is to explain how to get the body of a request sent to a HTTP webserver running on the ESP8266. In this example we will be sending to the server a HTTP POST request with some JSON body content.
You can check this previous tutorial where we explain how to configure the ESP8266 to work as a simple HTTP webserver. It will be useful for understanding some of the functions used here.
The code
First of all, we include the ESP8266WiFi library, which will make available the functionality needed for the ESP8266 to connect to a WiFi network. You can check a more detailed explanation on how to connect to a WiFi network from the ESP8266 on this previous post.
Then, we include the ESP8266WebServer library, which will make available the class ESP8266WebServer that we will use during this post.
Next, we declare a global object variable from the previously mentioned class. The constructor of this class receives as argument the port where the server will be listening. We will pass 80, which is the default port for HTTP.
We will also specify the name (SSID) and password of our WiFi network in two global variables.
#include <ESP8266WiFi.h>
#include <ESP8266WebServer.h>

ESP8266WebServer server(80);

const char* ssid = "YourNetworkName";
const char* password = "YourNetworkPassword";
For the setup function, we will start by opening the serial port and then connecting to the WiFi network. One important thing is to print the local IP of the ESP8266 on our WiFi network, so we know where to send the HTTP request. To get this value, we just call the localIP method on the WiFi global variable and then print it to the serial port.
Serial.begin(115200);

WiFi.begin(ssid, password);  //Connect to the WiFi network

while (WiFi.status() != WL_CONNECTED) {  //Wait for connection

   delay(500);
   Serial.println("Waiting to connect...");
}

Serial.print("IP address: ");
Serial.println(WiFi.localIP());  //Print the local IP
Then, we need to specify which code to execute when an HTTP request is performed to our websever. To do so, we call the on method on our previously declared server global object.
As the first argument of this method, we pass it the path or route where the server will be listening to. As second argument, we specify an handling function that is executed when a request is received on that path. Naturally, we can specify multiple paths and handling functions, but for our simple example we will only use a path called “/body”.
server.on("/body", handleBody); //Associate the handler function to the path
So, the code mentioned bellow indicates that when an HTTP request is received on the “/body” path, it will trigger the execution of the handleBody function. Note that we don’t specify the IP or port where the ESP8266 is listening, but only the path of the URL from that point onward.
Now, to start our server, we call the begin method on the server object.
server.begin(); //Start the server
Serial.println("Server listening");
To handle the actual incoming of HTTP requests, we need to call the handleClient method on the server object, on the main loop function.
void loop() {

  server.handleClient(); //Handling of incoming requests

}
Finally, we need to specify our handling function, called handleBody. But first, we need to take in consideration that there is no specific method or function to access to the body of a request. Thus, in the current implementation, the body of the request is placed on an argument called “plain”.
So, the first thing we will do is checking if an argument called “plain” exists for the received request. If not, we will return a message saying that the body was not received.
To check if a certain argument exists, we need to call the hasArg method on the server object, which receives as input the name of the argument. It will return a Boolean value indicating if it exists or not.
To send a response to a request, we just call the send method, which receives as input the the HTTP response code, the content type and the content.
if (server.hasArg("plain")== false){ //Check if body received

	server.send(200, "text/plain", "Body not received");
	return;

}
If the body was received (as the “plain” argument), we just obtain it by calling the arg method on the server object and pass as input the name of the argument.
String message = "Body received:\n";
message += server.arg("plain");
message += "\n";
Finally, we send back the body to the client in a response message. Additionally, for the purpose of illustration, we are also printing this message to the serial port. Note that if your webserver will be receiving a lot of requests in short periods of time, then printing outputs to the serial port may affect performance.
server.send(200, "text/plain", message);
Serial.println(message);
Check the full code bellow.
#include <ESP8266WiFi.h>
#include <ESP8266WebServer.h>

ESP8266WebServer server(80);

const char* ssid = "YourNetworkName";
const char* password =  "YourNetworkPassword";

void setup() {

	Serial.begin(115200);
	WiFi.begin(ssid, password);  //Connect to the WiFi network

	while (WiFi.status() != WL_CONNECTED) {  //Wait for connection

		delay(500);
		Serial.println("Waiting to connect...");

	}

	Serial.print("IP address: ");
	Serial.println(WiFi.localIP());  //Print the local IP

	server.on("/body", handleBody); //Associate the handler function to the path

	server.begin(); //Start the server
	Serial.println("Server listening");

}

void loop() {

	server.handleClient(); //Handling of incoming requests

}

void handleBody() { //Handler for the body path

	  if (server.hasArg("plain")== false){ //Check if body received

			server.send(200, "text/plain", "Body not received");
			return;

	  }

	  String message = "Body received:\n";
			 message += server.arg("plain");
			 message += "\n";

	  server.send(200, "text/plain", message);
	  Serial.println(message);
}
Testing the code
To test the code, start by uploading it to the ESP8266 using the Arduino IDE. Then, open the serial port, wait for the connection to the WiFi Network and copy the local IP printed.
Then, to send a post request for the ESP8266 with a body content, the fastest way is by using a tool like Postman. Postman is a HTTP client to test HTTP requests [2], which is particullary usefull when testing REST APIs. You can check here an introdutory video on how to make GET requests with Postman and here how to make POST requests.
So, after opening Postman, choose the POST method from the method dropdown, and put the URL where the request will be sent:
http://192.168.1.73:80/body
Note that you should change the 192.168.1.73 (the IP of my ESP in my network) by the local IP that was printed on your Arduino console.
Then, go to the body tab of postman, choose the “raw” radio button and on the last dropdown of that row choose JSON(application/json). Finally, on the input text box bellow, put the content of your request. In this example, I’ve sent some dummy JSON content, representing a command to a device:
{
"device": "Relay",
"status": "On"
}
Then hit send and if everything was correctly configured, you should get an output as shown in figure 1, which also has the main areas to configure mentioned before highlighted.

Figure 1 – HTTP POST Request via Postman.
For the ESP8266 side, you can check the serial console, where the body of the request received should now be printed, as shown in figure 2.
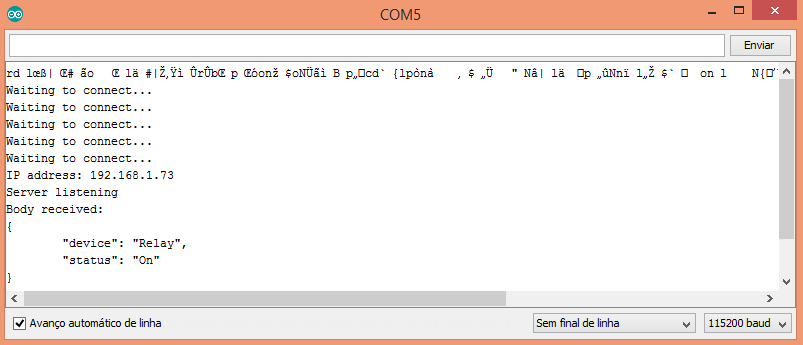
Figure 2 – Output of the program, printed to the Arduino serial console.
As an additional test, you can clear the body content from Postman and re-send the request. In that case, since no body was sent, a “Body not received” message should be returned by the server.
Related Content
Related Posts
- ESP8266: Connecting to a WiFi Network
- ESP8266 Webserver: Controlling a LED through WiFi
- ESP8266: Setting a simple HTTP webserver
- ESP8266 Webserver: Getting query parameters
- ESP8266: uploading code from Arduino IDE
References
[1] https://github.com/esp8266/Arduino/issues/1670
Technical details
ESP8266 libraries: v2.3.0
Hello sir! i want to make graphical webpage for Lubricant level monitoring through esp8266 arduino uno and ultrasonic.. i don’t have any idea where to start plz guide thanks
Hi!
That’s a considerably complex project if you don’t have previous experience with the ESP8266 and/or web development.
How do you want to develop the webpage? will it be hosted on the ESP8266 or will it be hosted somewhere and contact an ESP8266 API?
There’s also the option for the ESP to send the data periodically to a web server to be stored on a database and then some application fetch the data from there and show it in a web page. This is most likely the easiest solution.
Regarding the Lubricant monitoring I really don’t have any ideia how to achieve that with ultrasonic or other sensors. That is a very specific area and I really don’t know which sensors are suitable for what you aim to achieve.
My recommendation is that you first learn the basics of ESP8266 programming if you haven’t done it yet.
Also, you need to know which sensors are suitable for the measurements you wnt to achieve.
Only then and after being able to fetch measurements from the sensor correctly I would worry about the remaining part of the system.
Best regards,
Nuno Santos
great tutorial,
i have two nodemcu , one acts as a webserver and the other as client. I am trying to sent some message from client to server and am expecting a response from webserver. do you have any projects on this scenario
Hi! Thank you 🙂
I have no tutorial on how to do that end to end, but if you already have the webserver part working on one nodeMCU, then you just need to be able to do the requests from the other nodeMCU.
Please check these tutorials on how to do HTTP GET and POST requests with the ESP32:
https://techtutorialsx.com/2016/07/17/esp8266-http-get-requests/
https://techtutorialsx.com/2016/07/21/esp8266-post-requests/
I think these should put you in the right track. Naturally, you need to decide the content of the request (simple text, JSON, etc..) and how the server will answer, but these should fit your application needs.
Hope this helps you.
Best regards,
Nuno Santos
Thanks Nuno
Excellent work Nuno. As usual.
Just what I was looking for.
Hi!
Thank you very much for the feedback, I’m very happy to know you are finding the tutorials useful 🙂
Best regards,
Nuno Santos
Excellent work Nuno. As usual.
Just what I was looking for.
Hi!
Thank you very much for the feedback, I’m very happy to know you are finding the tutorials useful 🙂
Best regards,
Nuno Santos
hi sr, is possible apply your example with https.