The objective of this post is to explain how to connect the ESP8266 to a Flask Webserver and send a HTTP GET Request.
The Python code
For this example, we will use Flask to deploy a simple webserver that will listen to HTTP GET requests on a certain URL and output a simple text message to the client. The code will be very similar to the one of this previous post, where we explain the basics of Flask.
First of all, we import the Flask class from the flask module, so all the functionality we need becomes available. Then, we create an instance of the Flask class. In the constructor, we pass the name of the module of our application, using the __name__ global variable.
from flask import Flask
app = Flask(__name__)
Then, we will declare the route where our web server will be listening to incoming requests. We will use the /helloesp URL. The handler function for this route will just return a simple hello message, as seen bellow.
@app.route('/helloesp')
def helloHandler():
    return 'Hello ESP8266, from Flask'
Finally, we run our application with the run method.
app.run(host='0.0.0.0', port= 8090)
So, as indicated by the arguments of the run method, our server will be listening on port 8090 and on the machine default IP address. You can check here in more detail the meaning of the 0.0.0.0 IP address. But, to sum up, in the context of servers, 0.0.0.0 means all IPv4 addresses on the local machine [1], which is what we want so the server becomes available on our local network.
The full code for the server can be seen bellow.
from flask import Flask

app = Flask(__name__)

@app.route('/helloesp')
def helloHandler():
    return 'Hello ESP8266, from Flask'

app.run(host='0.0.0.0', port= 8090)
I recommend to do a quick test without the ESP8266 to check for problems in the server code. This way is much easier to debug than running the whole code and trying to figure out in which component the problems are.
So, we can run the code, for example, from IDLE, the Python IDE.
Since we want to confirm that our server is available in the network, we need to discover its IP on the network. In windows, we can do it from the command line using the ipconfig command. On Linux, we can use the ifconfig command.
After discovering our IP address on the network, we can test the server using, for example, a web browser or a tool like Postman, which allows us to do HTTP Requests very easily.
Ideally, if you have another computer on your network, you can send a HTTP request from there, to the previously discovered IP address. If not, you can test it from the same machine, although it will only allow to confirm that the server code is running correctly, not that it is reachable from other devices on the network.
As seen in figure 1, I tested it from Postman. So, I sent a GET request on the following URL: IP:port/route, where /route is equal to the /helloesp we defined early. Note that, in postman, we don’t need to put the http prefix before specifying the IP address.
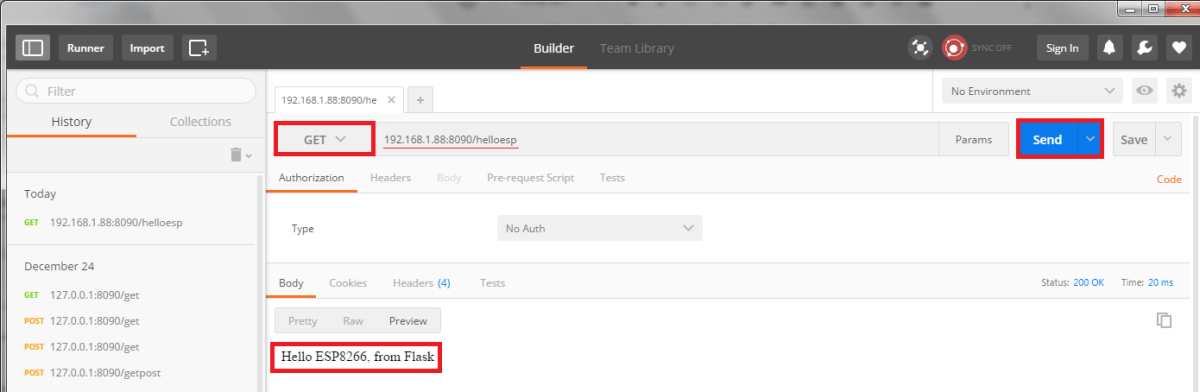
Figure 1 – Testing the server code with Postman.
If you don’t wan’t to use Postman, simply open a web browser and put the following in the address bar:
http://IP:port/route
The result can be seen in figure 2 below.

Figure 2 – Testing the server code from a web browser.
Important: you are not going to be able to connect to the Flask app from outside your router’s network with this method. To do it, you would need to do port forwarding, so the server would become accessible from the Internet. Port forwarding a router depends on the model of the device, so explaining how to do it is outside the scope of this post. So, our use case only works if the ESP8266 is connected to the same router of the computer that is running the Flask server.
The ESP8266 code
The ESP8266 code will also be based on a previous post, which you can check for more details on the functions used.
First, we need do include some libraries that will allow us to connect to a WiFi Network and to send HTTP requests.
#include <ESP8266WiFi.h>
#include <ESP8266HTTPClient.h>
Now, in the setup function, we will start a serial connection, so we can print the output of the request to our server. We will also connect to the WiFi network.
void setup () {

  Serial.begin(115200);
  WiFi.begin("YourNetwork", "YouNetworkPassword");

  while (WiFi.status() != WL_CONNECTED) {

    delay(1000);
    Serial.println("Connecting..");

  }
  Serial.println("Connected to WiFi Network");

}
Our code to make the request will be now specified in the main loop function. First, we declare an object of class HTTPClient, which we will simply call http. This class provides the methods to create and send the HTTP request.
After that, we call the begin method on the http object and pass the URL that we want to connect to and make the GET request. The URL will be the one specified in the previous section. Note that in this example code I used the IP of my machine where the Flask server is running. You should change it to the one you discovered with the ipconfig or ifconfig command.
HTTPClient http; //Declare an object of class HTTPClient
http.begin("http://192.168.1.88:8090/helloesp"); //Specify request destination
Then, we send the request by calling the GET method on the http object. This method will return the status of the operation. If the value is greater than 0, then it’s a standard HTTP code. If the value is less than 0, then it’s a client error, related with the connection. All available error codes for this method are listed here.
So, if the code is greater than 0, we can get and print the response payload, by calling the getString method on the http object. If not, we print an error message.
int httpCode = http.GET(); //Send the request

if (httpCode > 0) { //Check the returning code

    String payload = http.getString();   //Get the request response payload
    Serial.println(payload);             //Print the response payload

}else Serial.println("An error ocurred");
Finally, we call the end method. This is very important to close the TCP connection and thus free the resources.
http.end(); //Close connection
The full code can be seen bellow. Note that we introduced a delay of 10 seconds between each GET request.
#include <ESP8266WiFi.h>
#include <ESP8266HTTPClient.h>

void setup () {

  Serial.begin(115200);
  WiFi.begin("YourNetwork", "YouNetworkPassword");

  while (WiFi.status() != WL_CONNECTED) {

    delay(1000);
    Serial.println("Connecting..");

  }
  Serial.println("Connected to WiFi Network");

}

void loop() {

  if (WiFi.status() == WL_CONNECTED) { //Check WiFi connection status

    HTTPClient http;  //Declare an object of class HTTPClient

    http.begin("http://192.168.1.88:8090/helloesp"); //Specify request destination

    int httpCode = http.GET(); //Send the request

    if (httpCode > 0) { //Check the returning code

      String payload = http.getString();   //Get the request response payload
      Serial.println(payload);             //Print the response payload

    }else Serial.println("An error ocurred");

    http.end();   //Close connection

  }

  delay(10000);    //Send a request every 10 seconds

}
Testing everything
To test the full system, just upload the code to the ESP8266 using the Arduino IDE, with the Flask server running. You should get something similar to figure 3.

Figure 3 – Output of the ESP8266 application.
We can also test if our ESP8266 application works well if an error occurs on the Flask server. To do so, after some successful requests, just shut down the server, wait for some error messages, and then re run the server. The ESP8266 application should handle it fine, as shown in figure 4.

Figure 4 – Response of the ESP8266 application when the server is down.
Related Posts
References
[1] http://www.howtogeek.com/225487/what-is-the-difference-between-127.0.0.1-and-0.0.0.0/
Technical details
- Python version: v3.4.2
- Flask library: v0.10.1
- ESP8266 libraries: v2.2.0
Hello,
Python/Flask is one of my habitual web languages. The thing is that, for a project I’m working on, I’m trying to send an image base64 encoded to my server through a POST. After a lot of trials and errors, event trying your POST example in this blog, I have to reckon that the server, for some reason, never reads the parameters. I always read nulls. Curl and html forms work perfectly but not from ESP8266.
Do you know of any reason/bug that might exist?
Hi!
Unfortunately that is an use case that I’ve never tested, so I’m not sure what might be the cause :/
How big is the result of the base64 encoding of the image? Maybe it exceeds some internal buffer and instead of crashing it simply doesn’t send the content?
One thing you can try to test this theory is using a really small image (just some pixels) and sending it from the ESP to check if the problem is related. If for small images it works, then this might be the cause
Another suggestion is to ask around the ESP8266 Arduino core github page, maybe someone there already faced the same issue and can help.
Please let us know if you find a solution, as it might help others trying to achieve the same 🙂
Best regards,
Nuno Santos
I get ‘An error occured’ everytime. I tried restarting the server many times, didnt work. What could be the problem?
Same for me. Have You found any solution?
Not sure where your error is, however, these were few errors that I got and how I solved them:
a) Got “esptool.FatalError: Timed out waiting for packet header” error:
I got this error when I tried to upload my code to run on the board. Solved this by pressing and holding the ‘Reset’ button on the board while uploading the code.
b) Got the “ERROR: ets Jan 8 2013,rst cause:2, boot mode:(3,6)” on serial monitor:
Remove the following lines:
‘String payload = http.getString();
Serial.println(payload);’
Reference: https://forum.arduino.cc/index.php?topic=633075.30
I am using NodeMCU (with ESP 8266 microprocessor), on macbook using UART connection.
Let me know if you have other errors. I ran the code, and i worked for me.
Hello ANTEPHER,
Every time I am uploading this code to my nodemcu, it gives “An error occcured” in my serial monitor of arduino. My flask server is running well and also giving response to postman. when i v written “Serial.println(httpCode);” in my code it prints -1 on to my serial monitor. Please respond…kindly help me on this regard.
Hi I am working on a very similar project of yours. The difference is that I need to get user input via web forms. For that I have written the HTML code which contains three form fields the purpose of each form is to get integer input from user and send it to ESP8266(client).We have FLASK API(Server) for handling this operation. The problem is that whatever input I give inside the web forms are getting printed in python’s output terminal, but I need to send them to esp8266 it’s also done but the output is unexpected . Rather than displaying the value given inside web forms entire HTML code of that form is getting displayed in Arduino IDE’s Serial monitor. Please suggest me a good method for solving this. I am a beginner in python as well as Arduino programming.